 Online documentation - Websydian v6.1 Online documentation - Websydian v6.1
|
Deploying Websydian CWA Applications on Microsoft IIS
- Before continuing make sure you have Generated and Build your
Websydian Application.
Successful Generation and Build of Websydian Applications.
- Create a directory on the Web Server where you will be
installing the Websydian application. (The Websydian directory)
e.g. C:\InetPub\wwwroot\webtutor
- Copy the files located in your "release" directory to the
Websydian directory just created.
- Create a directory called html as a subdirectory to the
Websydian directory. e.g. C:\InetPub\wwwroot\webtutor\html
- Copy your Document Templates to the html directory.
- From your CA Plex bin library copy the CA Plex runtime DLL's to
the Websydian directory.
Further information on which DLL's to copy see the CA Plex
help.
- If using any Active-X controls make sure to copy these to.
- Open the ini-file located in the Websydian directory with the
notepad.
Check the section [HTML] for the following settings:
[HTML]
PATH=.\HTML\
DATE=dd/mm/yyyy
TIME=hh:mm:ss
TIMESTAMP=dd/mm/yyyy hh:mm:ss
Make sure the DATE, TIME and TIMESTAMP has the correct
format for your Websydian Application.
- In the ini file make sure to add the following information in
order to suppress Plex dialog messages.
[Message Box]
Always Log=True
Log File=c:\dialogmsgs.txt
Where the "Log File" indicates the file to receive the content of
the dialog messages. This is useful if tracing problems in
applications running under the IIS.
Microsoft IIS 7.0
Special handling is required for the dispat.ini file for the IIS
7.0.
The dispat.ini file is automatically copied to the folder
c:\Windows\System32\config\systemprofile\Documents\ in a sub folder
with the name of the exe file deployed.
When updating the ini file make sure that you delete the file
that was copied to the folder described above.
When performing the final deployment on the Web Server make sure
to create an individual local user on the Web Server, this user is
to be used to service all Websydian applications on the Web
Server.
If the deployment is done on a workstation running the Plex
development environment the user to be used is the currently logged
on user.
Some background is required to understand the reason for
this.
As the Plex runtime loads required DLL's each loaded DLL is
tagged with information about the user who loaded them. If another
user on the same machine tries to load the same DLL it will
fail.
Because the IIS is running as a service this can be thought of
as another user.
- Create a NT User Profile based on the IUSR_computername for the
Websydian Application. Note the password, it will be used as the
anonymous user in the next step.
In some cases we have found that a network user is required to
run the Websydian Application under the IIS. Especially when using
iSeries as back-end.
- Open the Internet Services Manager.
- Create a Virtual Directory by right clicking the Web Site you
which to use (Default Web Site) - Select menu item New ->
Virtual Directory
Follow any wizards shown.
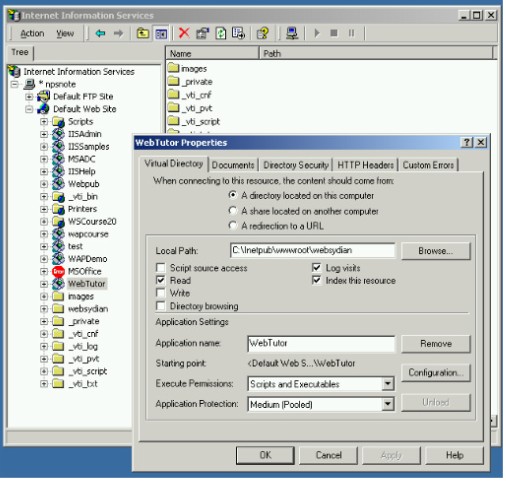
Make sure that the following settings are correct:
Local Path should point to the Websydian Application
directory.
Application name is the name to refer when browsing your web
site (e.g. webtutor >>
http://localhost/webtutor/dispat.exe)
Execute Permissions should be set to "Scripts and
Executables" for running CGI programs.
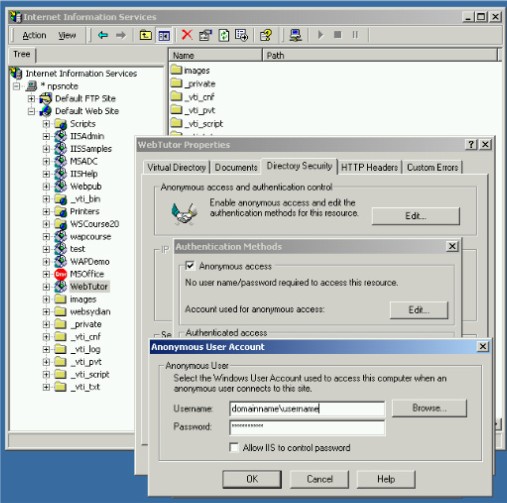
- Go to the tab "Directory Security"
Press the button "Edit" to open the window "Authentication Methods"
and press the button "Edit" to show the "Anonymous User
Account.
If you created a new NT User Account in the previous step insert
the user in the Username, Uncheck the Allow IIS to control password
and insert the password for the NT User Account in the password
field.
NB: If deploying the Websydian Application on a workstation,
insert the username and password of the developer.
If you wish to suppress the *.exe in the url you can do this by
adding the exe file as a default document under the Documents tab.
Remember to alter the URL reference in the document templates by
removing the *.exe file reference.
For Microsoft Windows 2003 Server you will need to enable
the processing of CGI programs in the Internet Information
Manager.
- Logon to the NT Server as the user specified in the "Anonymous
User Account" under the Virtual Directory.
- Open a command prompt window
- Change to the directory where your Websydian Application is
installed.
- Set the environment variable REQUEST_METHOD to the value POST
using the set command.
SET REQUEST_METHOD=POST
- Start the dispatcher and redirect output to a file, e.g.
DISPAT > TEST.HTM
(assuming dispat is the name of your dispatcher)
If you get any errors running the dispatcher, correct them and try
again. When the dispatcher seems to complete normally (no dialog
messages), check the contents of the output file test.htm, and
ensure that it contains the expected HTML output.
The easiest way of handling images or static pages when
deploying on the IIS is by setting the "Execute Permissions" to
none on the directory html.
For images create a subdirectory under the html directory called
images.
The reference to the images will be ../webtutor/html/images
- "Running application from command prompt works and the output
is correct, but when accessing the application from my internet
browser there is no output or a CGI error is displayed"
- Using an iSeries as back-end the password in the ini file is
not correct, how do I set the encrypted password in the ini
file.
- Make sure the user account used as anonymous user under the
virtual directory can logon to the server. Know logon to the server
using this account and run the dispatcher from command line as
explained under the section "Test the Websydian
Application".
- If the dialog screen used to enter the information for the
iSeries logon is not displayed make sure to add the option VAR
"WSYD Connect to AS400 if no web" to the dispatcher function and
set the value SYS to Yes. Read more
here.
- "Using iSeries as database server the Websydian application
works fine when using the internet browser on the server but when
accessing the site from another computer either no output is
displayed or a CGI error".
- The problem might be the information regarding user and
password saved in the ini file for the connection to the iSeries is
incorrect. Check the anonymous user under the virtual directory and
logon to the server using this account.
Run the dispatcher from the command prompt in order to enter
correct information regarding user and password for the
iSeries.
- "Even though trying all of the above the application does not
work".
- In order to find the problem we suggest installing the Apache
web server see the whitepapers. The problem is often a missing dll.
When using the Apache web server you will be prompted all dialog
messages from the application.
Make sure not to install the Apache web server as a
service.