|
|
This document describes the use of our tool for setting up a test environment for you Windows DWA applications. The idea is to supply developers whit an easy approach for setting up all the required component for the Websydian DWA environment in order to execute your application.
Make sure that you have the Java SDK installed on your system. We recommend that you use the latest version, follow the link below to download.
Make sure that you have the Apache Tomcat installed on your system. We recommend that you use the latest version, follow the link below to download.
During installation just keep default settings. The Tomcat is installed as a service make sure that the service is started by opening the windows Control Panel -> Administrative Tools -> Services.
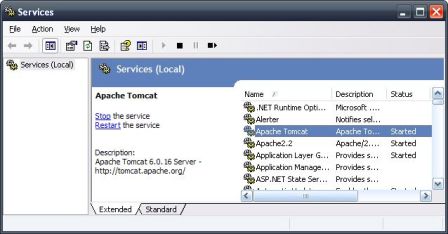
You can test the tomcat by opening your browser and entering http://localhost:8080. You should see the Tomcat Welcome screen.
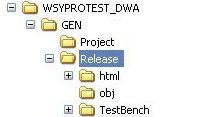
Download the test environment using the link below and unpack the directory 'TestBench' and all subdirectories to your CA Plex Release directory
It is very important that the 'TestBench' directory is located in the 'Release' directory if in doubt take a look at the picture below!
.
Some information is required by the test environment so please do the following:
Make sure all objects have been generated and build. Also make sure that an exe file have been generated for your ApplicationServiceListener as well as correct settings have been added to the ini file.
The test bench is now ready for action. In the daily use of the test bench use these commands.
The following are the available settings for the 'Deploy' command. These settings can be found in the 'DeploySettings.cmd' file.
| Setting | Description |
|---|---|
| LISTNER_IMPL | This is the implementation name of the ApplicationServiceListener as implemented in your local model |
| TOMCAT_PATH | The directory where the Apache Tomcat have been installed |
| URL_CONTEXT | The name to be used as the first part of the URL when accessing your application from the browser. This is also used as the name of the directory used when deploying the application into Apache Tomcat. For servlet engines this is also known as the context root. E.g. http://localhost:8080/contextroot/servletname, in this case the contextroot is the first part of the URL |
| HTML_PATH | The directory where html files are generated by the Websydian document template generators |
| RELEASE_PATH | The directory used as your release directory. |
| DEPAPP_PATH | Indicates where the deployment process is to copy objects for the Application Services to run. |