 Online documentation - Websydian v6.1 Online documentation - Websydian v6.1
|
Upload
- Upload is only supported in DWA using the servlet based Web
Server Component.
- The web server and the application server must both have access
to the same folder on the file system where the uploaded files can
be stored.
The figure below shows the steps involved when a upload request
is sent to a Websydian application.
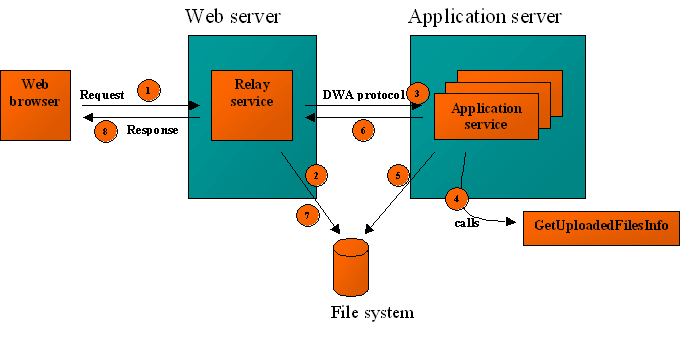
Figure 1: Flow for an upload request
- The browser sends a request to the web server including one or
more files to be uploaded to the server.
- The Web Server Component servlet saves the files to a folder
(configured in the property file).
- The Web Server Component servlet sends information about the
files to the application service.
- The application service uses a service function to retrieve the
information about each file (including the filename).
- Using the information from the previous step the application
service then reads and processes the files. If the file should be
preserved for later use the application service must copy/move it
to another location.
- The application service creates a response page to the user (by
calling a page generator function).
- The Web Server Component servlet deletes the file created in
step 1).
- The response page is sent to the browser.
Steps 1 - 3 and 7 - 8 are handled automatically by the Websydian
runtime. Steps 4 - 6 must be handled by the application developer
in the event handler function.
Upload must be enabled in the Web Server Component servlet. This
is done by setting the following properties in the property
file:
| Property |
Description |
Default |
| servlet.upload |
Enables upload. Legal values are TRUE and FALSE (case
insensitive). |
FALSE |
| servlet.upload.tempfolder |
The folder where the uploaded files are temporarily stored.
Examples could be:
- c:/temp
- /myapp/uploadfilestemp
|
The temporary folder used by the Java virtual machine |
| servlet.upload.maxfiles |
The maximum number of files that can be uploaded in one
request. |
5 |
If you want to upload larger files it might be necessary to
adjust the property servlet.contentlength.max which determines the
maximum size of a request.
Please refer to
Servlet Web Server Component Options for more information.
For security reasons it is recommended that the temporary folder
is set to a folder that does not contain any other files.
To enable upload for an event handler function apply the
following steps:
- Create a text field and insert it in the WebInput variable. For
convenience the field can inherit from WSYBASE/FormFieldName, but
this is not necessary. The only requirement is that the field is of
type Character and is long enough to contain its own implementation
name.
- In the edit point '0 call to build of document' insert a call
to the function WSYUTIL/GetUploadedFilesInfo. Map with the field in
step 1) and WsyBase<ConnectionPointer>
- GetUploadedFilesInfo will return the information displayed in
the table below.
| Output field |
Description |
| OriginalFilename |
The original name of the file. |
| ContentType |
The content type of the file. This field will be blank if no
content type was supplied by the client. |
| Charset |
The character set encoding used in the file. This field will be
blank if no character set information was supplied by the
client. |
| UploadedFile |
The name of the temporary file stored by the Web Server
Component. If no file was uploaded this field will be blank.
The file is stored in the folder specified by the Web Server
Component servlet property servlet.upload.tempfolder (see Web Server Component servlet for more
information). |
Please note that the temporary file returned in the field
UploadedFile will be deleted immediately after the request has been
processed.
So if you want to keep the file it must be moved/copied to
another location.
Use the information above to process the file.
- The event handler must then call a page generator function
which generates a response page to the user.
- Generate and build the page generator, the scoped event
handler, and the document template generator functions.
- After executing the document template generator change the
created input field in the template from type TEXT to type
FILE.
The line to be changed will look something like this:
<P>Upload file<INPUT TYPE="TEXT" NAME="WU6A"
VALUE="/(WU6A)" MAXLENGTH="128" SIZE="64"></P>
In the above line change TYPE="TEXT" to
TYPE="FILE".
- In the template add the attribute enctype="multipart/form-data" to the FORM that
contains the input field in 4). E.g:
<FORM ACTION="/app" NAME="D7UPLEVN"
METHOD="POST" enctype="multipart/form-data">
If you want to upload more than one file in one request you
repeat step 1 to 6 for each file you want to upload creating a new
field in WebInput for each uploaded file.