|
|
This paper is aimed at web designers who are working with the Document Templates delivered with a Websydian application in order to specify the layout of the application.
It is described how Websydian Generates HTML Pages from Document Templates and what is the contents of these Templates. The process of modifying Document Templates is explained and a number of frequently asked questions about the Templates are answered.
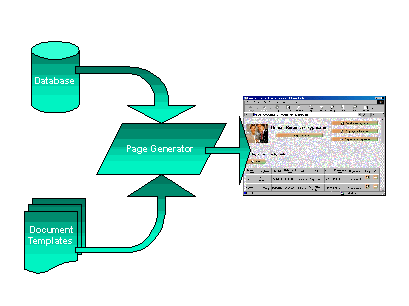
In Websydian, HTML document generation is controlled by Document Templates. A Document Template is a regular HTML document that contains Replacement Markers which are codes telling the Page Generator function that values are to be inserted at specific points in the generated HTML documents.
When an HTML document is to be generated, a Page Generator function is responsible for reading the Document Template for exactly that HTML document and substituting all Replacement Markers in the template with data values. When generated, the resulting HTML document is then sent back to the web browser/user.

The Document Templates determine what the HTML pages in the web application look like. All the Page Generator function does, is to substitute the Replacement Markers with run-time data values.
When the HTML layout of a Websydian application must be added or changed, only the Document Templates need to be edited. In this way, the HTML document generated by a web application can be changed completely without having to change a single line of program code. The substitution process only cares about the replacement markers - everything else in the Document Template is generated/copied over exactly as-is. With the Websydian approach to HTML page generation, the functional design of the application is separated from the visual design of the layout of the generated HTML pages.
Merging Document Templates with data from database.
All of the process of merging the Document Template with data is done by the web server and the result is a pure HTML document. This approach ensures that the application will work with browsers on practically any platform.
The Document Templates are themselves represented in an HTML format, and the Replacement Markers are just a special kind of text recognized by Page Generator functions while not violating the rules of HTML.
Since Document Templates are valid HTML documents, they can be edited using any HTML editor, e.g. the Microsoft FrontPage HTML editor.
When an application made with Websydian is delivered to the customer, it is accompanied by a number of Document Templates. If not done already, a nice and proper design must be applied to the Document Templates. The figure below shows a ‘raw’ Document Template as it may looks like:
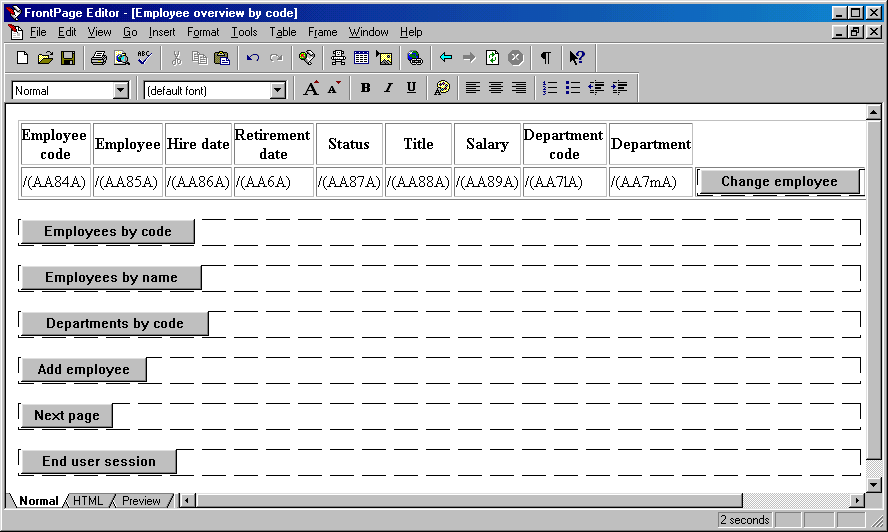
A ‘raw’ Document Templates before designing. The functionality of the running application will work, but no layout has been applied.
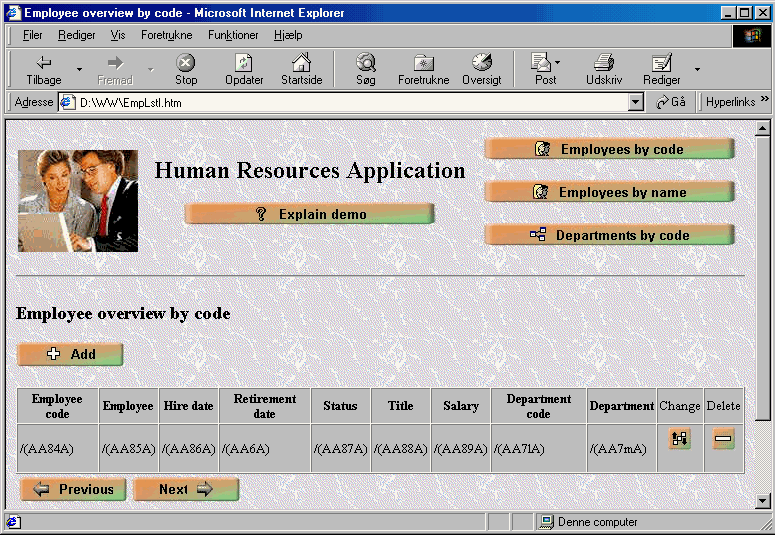
A nice layout must be applied to the Document Templates of the application. In this way, the Document Template shown above could be modified to:

Document Template after layout has been applied. The visual appearance has been changed while the underlying functionality will remain the same.
The web designer will work with the Document Templates delivered with the Websydian application.
The Document Template control the HTML page generation. A Document Template is a regular HTML document containing Replacement Markers which are codes telling the Page Generator function that value are to be inserted at specific points in the Template. When an HTML page is to be generated, a Page Generator function is responsible for reading the correct Document Template and substituting all Replacement Markers in the Template with actual values. The resulting HTML document is then sent to the web browser.
The Document Templates determine what the HTML documents generated by the web application will look like. All the Page Generator functions do is to substitute the Replacement Markers with run-time data values.
All editable data represented in the Document Templates are linked to an HTML form (<FORM …>) and it is these forms that are sent to the web server by clicking on the push button belonging to the form. Usually, each form has only one button and this button does the submit of the form to the web server which in turn triggers the specified web server functionality.
In the HTML examples in the next section, two buttons appear - one for CHANGE and one for DELETE (displayed in the example as icons). When looking into the HTML code for the HTML document, it can be seen that each button is placed in it’s own form.
In Websydian Document Templates, Grids (or repeating rows of data) are represented by representing a single Grid line:
A grid in a Document Template is represented by representing a single Grid line.
During run-time page generation, the Grid row will be repeated resulting in a Grid of Data:
Several Grids lines are generated in the resulting HTML page.
From the HTML code below, it can be seen that a Grid Start and End indicates the portion of the Document Template to be repeated.
<table border="1" bordercolordark="#808080"
cellpadding="2" bordercolorlight="#FFFFFF"
bordercolor="#C0C0C0"
bgcolor="#C0C0C0" width="100%" cellspacing="0">
<tr>
<th><small>Employee
code</small></th>
<th><small>Employee</small></th>
<th><small>Hire
date</small></th>
<th><small>Retirement
date</small></th>
<th><small>Status</small></th>
<th><small>Title</small></th>
<th><small>Salary</small></th>
<th><small>Department
code</small></th>
<th><small>Department</small></th>
<td checked="false"><small>Change</small></td>
<td checked="false"><small>Delete</small></td>
</tr>
<!--/(Grid)-->
<tr id="A/(AA84A)" style="color: black; background:
#C0C0C0">
<td><small>/(AA84A)</small></td>
<td><small>/(AA85A)</small></td>
<td><small>/(AA86A)</small></td>
<td><small>/(AA6A)</small></td>
<td><small>/(AA87A)</small></td>
<td><small>/(AA88A)</small></td>
<td align="right"><small>/(AA89A)</small></td>
<td><small>/(AA7lA)</small></td>
<td><small>/(AA7mA)</small></td>
<td valign="middle" align="center"><form action="/Webdemo/HRWebMnu.exe"
method="POST"><input
type="hidden" name="ORGCAL"value="/(ORGCAL)">
<input type="hidden"
name="WSYD_SIGN
"value="/(WSYD_SIGN)/(EmpUpdR)">
<input type="hidden"
name="WSYD_SID"
value="/(WSYD_SID)"><input
type="hidden" name="WSYD_EVENT" value="EmpUpdR"><input type="hidden"
name="AA84A" value="/(AA84A)"><p><small><input type="image"
src="images/ButtonChange.jpg"
alt="Change employee" value="Change"
name="Change employee" border="0"
WIDTH="24" HEIGHT="24"></small></p>
</form>
</td>
<td valign="middle"
align="center"><form
action="/Webdemo/HRWebMnu.exe"
method="POST"><input type="hidden" name="ORGCAL"
value="/(ORGCAL)"><input type="hidden" name="WSYD_SIGN"
value="/(WSYD_SIGN)/(EmpDltR)"><input type="hidden" name="WSYD_SID"
value="/(WSYD_SID)"><input type="hidden" name="WSYD_EVENT"
value="EmpDltR"><input type="hidden" name="AA84A"
value="/(AA84A)"><p><small><input type="image"
src="images/ButtonDelete.jpg" alt="Delete employee" value="Delete"
name="Delete employee" border="0" WIDTH="24" HEIGHT="24"></small></p>
</form>
</td>
</tr>
<!--/(Grid)-->
</table>
Again, note the <!--/(Grid)--> markers. The first marker indicates the beginning of the code that must be replicated for each record in the database, and the last marker indicates the end.
The Document Templates of a Websydian application can be modified and hereby changing the layout of the HTML documents generated by the web application. The sections below point out some rules and working procedures when working with the Document Templates.
The following rules comply when modifying the Document Templates of a Websydian application:
on moving fields and forms in a Document Template. Sometimes it does matter where in the Document Template fields and/or forms are located. Page generation in Websydian is a sequential process, and the substitution will always be done based on the current value of the data field in the program. In some Page Generators, these values changes during the page generation and it now matters where in the Document Template the fields are located. In this way, the NEXT button/form should always be located after the Grid (it will then be initialized with the last row in the Grid) while the POSITION button/form should be located above the Grid (hereby displaying the Positioner value(s) of the current list).
In an ideal world, it is only necessary for the programmer to generate the Document Templates once. In the real world however, an application is continuously subject to changes and the Document Templates need to be generated several time for different reasons. Because of this, the web designer must also modify the Document Templates of the application. In this way, copies should be made of the original Document Templates and the modifications should be applied to those copies.
This approach allows you to run a tool that can find the changes that have been made to new versions of Document Templates compared to the existing ones (an example of such a tool is the Windiff program included in the MS Visual Studio). When you know what the changes are, you also know exactly what needs to be updated in the designed version of the modified Document Templates.
In practice, a folder should be specified named after the application or the project. In this folder, three sub-folders should be created – one called ‘Raw’, one called ‘In progress’, and one called ‘Designed’ – ending up with the structure shown in the figure below:
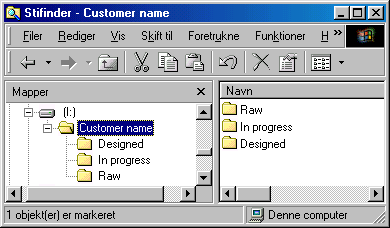
Folder structure for Document Templates.
The ‘Raw’ folder will hold the Document Templates that comes from the development team while the ‘In progress’ folder holds the Document Templates currently being worked on. The ‘Designed’ folder is to contain the completed Document Templates that are ready to be – or has already been – moved to the web server.
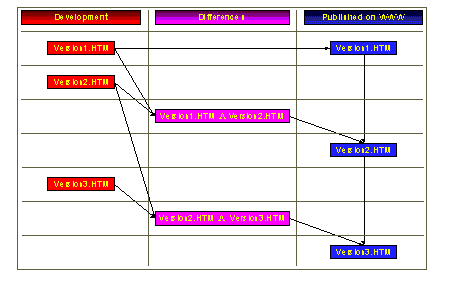
Evolution of a Document Template.
The figure above illustrates the evolution of a specific Document Template. A first version of the Document Template is handed over by development, and a copy of the Template needs to be taken. When visual design has been applied to the Document Template, it is ready to be used with the Websydian application.
Later, a version 2 of the Document Template is handed over by Development. Now, run your favorite tool to find the differences in the two HTML Templates in order to find the changes made since version 1. Note, that the two files to be compared are the original version 1 (that is, the one you got from development – not the designed version) and version 2 that you just got.
When differences between the two templates have been localted, make a copy of the designed version 1 and call it "version 2". Apply the changes that you found and then adjust the design accordingly. The new version 2 is now ready to be used with the Websydian application (move it to the ‘Designed’ folder and have it copied to the web server).
When the design of a Document Template is completed, the application must be re-tested before putting the Document Template into production. This is just to make sure that no Replacement Markers or other functionality has accidentally been changed or removed.
Even though it was mentioned above that the designed Document Templates should be named "Version 1" and "Version 2", the Document Templates must have their original name when moved to the web server. If the Template name is changed, the Websydian application will not be able to find the new Document Template.
This section contains a few frequently asked questions concerning the visual design of Document Templates.
As the button is of the type SUBMIT, what needs to be done is, to call the form’s submit method from a hyperlink.
<form ACTION="/somealias/MyWebSite.EXE" NAME="AA4hF" METHOD="POST" AUTOCOMPLETE="OFF">
<input type="hidden" name="WSYD_SID" value="/(WSYD_SID)">
<input type="hidden" name="WSYD_SIGN" value="/(WSYD_SIGN)/(AA4hF)">
<input type="hidden" name="WSYD_EVENT" value="AA4hF">
<input type="hidden" name="AA46A" value="/(AA46A)">
<input type="hidden" name="AAqA" value="/(AAqA)">
<a href="javascript:document.AA4hF.submit();"><p>Click Here
to place an order</a> </p>
</form>
HTML code showing how to convert a push button to a link.
If an ONSUBMIT= is specified in the <FORM…> then this must explicitly be called before calling the form’s submit method. In the example below, a Push button inside a form containing an ONSUBMIT event is converted to a hyperlink:
<form ACTION="/somealias/MyWebSite.EXE" NAME="AA4hF" METHOD="POST" AUTOCOMPLETE="OFF"
ONSUBMIT="javascript:ConvertNumbers();">
<input type="hidden" name="WSYD_SID" value="/(WSYD_SID)">
<input type="hidden" name="WSYD_SIGN" value="/(WSYD_SIGN)/(AA4hF)">
<input type="hidden" name="WSYD_EVENT" value="AA4hF">
<input type="hidden" name="AA46A" value="/(AA46A)">
<input type="hidden" name="AAqA" value="/(AAqA)">
<input TYPE="SUBMIT" NAME="PlaceOrder" VALUE="Place Order">
</form>
<form ACTION="/somealias/MyWebSite.EXE" NAME="AA4hF" METHOD="POST" AUTOCOMPLETE="OFF">
<input type="hidden" name="WSYD_SID" value="/(WSYD_SID)">
<input type="hidden" name="WSYD_SIGN" value="/(WSYD_SIGN)/(AA4hF)">
<input type="hidden" name="WSYD_EVENT" value="AA4hF">
<input type="hidden" name="AA46A" value="/(AA46A)">
<input type="hidden" name="AAqA" value="/(AAqA)">
<a href="javascript:ConvertNumbers();document.AA4hF.submit();"><p>
Click Here to place an order</a></p>
</form>
The method outlined here, can also be used to specify a graphic as the hyperlink (see below for another way to link from a graphic control).
The input type must be set to IMAGE instead of SUBMIT.
<form ACTION="/somealias/MyWebSite.EXE" NAME="AA4hF" METHOD="POST" AUTOCOMPLETE="OFF" ONSUBMIT="javascript:ConvertNumbers();">
<input type="hidden" name="WSYD_SID" value="/(WSYD_SID)">
<input type="hidden" name="WSYD_SIGN" value="/(WSYD_SIGN)/(AA4hF)">
<input type="hidden" name="WSYD_EVENT" value="AA4hF">
<input type="hidden" name="AA46A" value="/(AA46A)">
<input type="hidden" name="AAqA" value="/(AAqA)">
<input TYPE="IMAGE" src="images/PlaceOrder.GIF" alt="Place Order" border="0"
WIDTH="100" HEIGHT="24" NAME="PlaceOrder" VALUE="Place Order">
</form>
HTML code showing how to convert a push button to a graphic button.
Note that this method supports the ONSUBMIT event.
When it is needed to have field values in uppercase (that is, data send to the server must be in uppercase) one way is to attach an ONBLUR event to the field. The code in the event must then convert the content of the field to uppercase (the field contents is not converted until the cursor leaves the field).
<form ACTION="/somealias/MyWebSite.EXE" NAME="AA3aF" METHOD="POST" AUTOCOMPLETE="OFF">
<input type="hidden" name="WSYD_SID" value="/(WSYD_SID)">
<input type="hidden" name="WSYD_SIGN" value="/(WSYD_SIGN)/(AA3aF)">
<input type="hidden" name="WSYD_EVENT" value="AA3aF">
<input type="hidden" name="AA46A" value="/(AA46A)">
<input type="hidden" name="AAqA" value="/(AAqA)">
<input type="hidden" name="ORECNR" value="/(ORECNR)">
<input type="hidden" name="IADATO" value="/(IADATO)">
<input type="hidden" name="AAoA" value="/(AAoA)">
<p>Confirmation date:
<input NAME="AA4kA" VALUE="/(AA4kA)" MAXLENGTH="10" SIZE="10"
ONBLUR="javascript:this.form.AA4kA.value =
this.form.AA4kA.value.toUpperCase();">
<input TYPE="submit" NAME="Position" VALUE="Position to"></p>
</form>
Forcing a field to upper case.
It is also possible to use the STYLE keyword (style="text-transform: uppercase") in order to display the data in uppercase, but it is only for the display of data. When data are sent to the server, they will be sent in their original case (mix of lower and upper case).
Feel free to remove displayed Grid fields from the Document Template – removed fields can always be added to the Template again later. But be aware that the original Document Template will show all the fields that the programmer had selected.
The fields can be re-arranged (the order of the fields in the original Document Template is more or less random) and fields can be removed (and later added again). However, you cannot add fields that were originally left out by the programmer (if this is done, the data cells will be empty).