|
|
The authorized events feature was introduced in WebsydianExpress version 3.0.4. It allows you to add role-based authorization for each eventhandler you use in your application.
Prior to this, you were only able to use the roles to either allow or disallow access to an entire business process.
This would for instance mean that for a simple maintenance business process you could either give a user access to the business process - which means that he would be able to create, update, view, and delete the records - or you could block the user from accessing the business process, which means that he would not be able to do anything.
The authorized events feature allows you to make a more fine-grained authorization so that a user can have access to the maintenance function, be allowed to update and view the records - but not to create and delete them, while other users only will be allow to view the records, and still other users can have the full functionality available.
The easiest way to declare that an event should be authorized is to let the EventHandler inherit from Abstract.AuthorizedEventHandlerForProcess.
This sets the option AuthorizedEvent to Yes, which declares the event to be authorized.
This inheritance has two separate effects:
1. The document template generator create special replacement markers for the event.
When the template generator encounters an eventhandler, it will check for the AuthorizedEvent function option. If this option is Yes, the template generator will generate /(%IFAUTHEVENT-[eventname]).../(%ENDIF) markers around the HTML FORM for the event.
For [eventname], the generator will insert the implementation name of the authorized event.
When the PageGenerator function that uses the template encounters the /(%IFAUTHEVENT-[eventname]) marker, it will extract the event name and check whether the event is authorized. If the event is authorized, it will proceed as for a normal event. If the event is not authorized - the PageGenerator will not generate any HTML for the template until it finds the corresponding /(%ENDIF) marker.
In this way, the FORM is not generated and as such, it is impossible for the user to even know that it could be there.
2. When the eventhandler is called, it will check whether it is authorized for the session.
As the above shows, the authorization check that determines whether the button/link for the event is shown in the page depends on special replacement markers that must be in the page.
It is possible to remove these replacement markers, which will mean that no check will be performed - and that the button/link will be shown to all users.
To ensure that even though the button/link is shown to all users, only the authorized users actually will be able to use the event. The same authorization check as the PageGenerator performs is made by the EventHandler.
If the eventhandler finds that it is not authorized for the session - it will call an errorpage and an error message will be written to the message log.
If you have an existing page, where the event you want to authorized is used, you will normally not want to rebuild the template using the template generator, as this means that all modifications you have made to the generated template are lost.
You can ensure that the event is authorized in the page by simply enclosing the code you wan to protect in the special replacement markers:
/(%IFAUTHEVENT-[eventname])
[...the code to protect]
/(%ENDIF)
You should still let your EventHandler inherit from Abstract.AuthorizedEventHandlerForProcess and regenerate and build it to ensure that the authorization check is performed when the event is called.
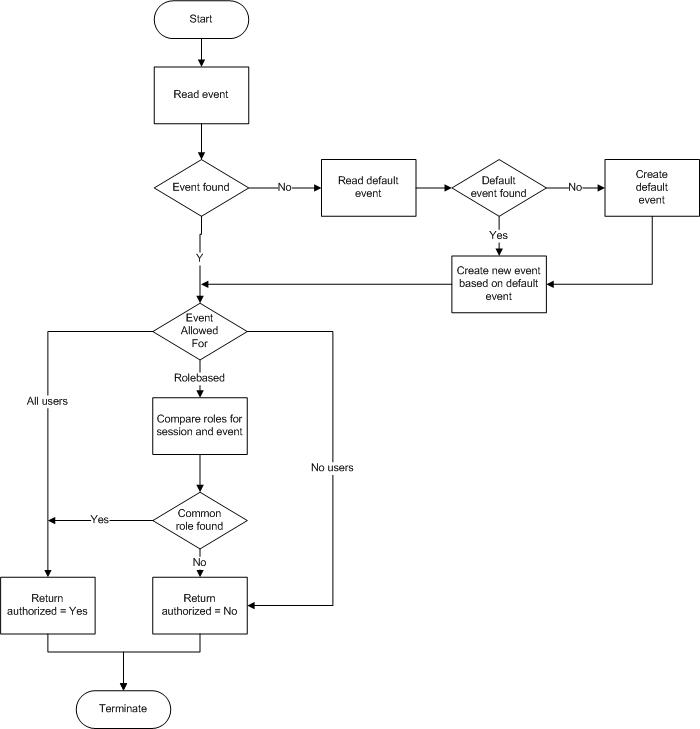
For each authorized event you can define one of three values for the field AllowedFor. This controls whether the rolebased authorization should be used for the event - and whether the event should be accessible if it should not.
This setting means that no authorization check is performed - all users are allowed to use the event.
This is in fact the exact behavior of the normal non-authorized events.
You can use this for events which you temporarily want everybody to have access to. You can still assign roles to the event, they just wont be evaluated.
This setting means the rolebased authorization is used for the event.
In effect, this means that for an event to be shown for a session, the session and the event must have at least one common role.
This setting means that no authorization check is performed - but it also means that no users will be able to access the event - no matter which roles they have.
This setting can be used to temporarily block all access to a malfunctioning event without having to remove the roles of the event.
You can also use this as the default setting for the automatically created events (see below) - in this way, you can automatically set roles for the events - but you ensure that an administrator has to check the settings before anyone can access the automatically events.
When the authorization check is performed, WebsydianExpress starts by checking whether the event is registered in the authorized event table.
If the event isn't registered, WebsydianExpress will create the event in the table. The event and it's authorization will be based on the default event for the site. If no default event is specified for the site, it will be created.
This means that by creating a default event for the site, you can create default authorization for all authorized events - without having to use the administration interface.
Each site can have one default event. It has the name *DEFAULT. You can maintain this event using the normal authorized events maintenance in the administration interface.
All roles assigned to the default event will also be assigned to the automatically created events. By setting AllowedFor = Rolebased for the default event and assigning appropriate roles, you can for instance ensure that all events are available for administrators and super users, while the more specific roles can be added manually using the administration interface.
By setting AvailableFor = All users, all automatically created events will be available for all users - until the definitions has been changed by an administrator.
By setting AvailableFor = No users, the automatically created events will not be available for any users - until the definitions has been changed by an administrator.
When WebsydianExpress retrieves the default event for a site and does not find one, it automatically creates a one. At the same time an informative message is written to the message log.
This diagram shows the behavior of the authorization check.