|
|
It is not uncommon that a web environment consists of several web applications developed by different vendors in different languages.
In such an environment you want to externalize the authentication of users, so users only have to login once to access the applications they are authorized to use.
The externalization of the authentication process to a central location is known as single sign-on.
This document shows an example of how to use an external system to control the authentication and authorization in WebsydianExpress.
The document is not an exhaustive treatment of the single sign-on problem domain; it is more meant to be an inspiration for developers who want to use another system to authorize WebsydianExpress users.
The functionality described in this document is relevant for WebsydianExpress version 3.0 and later.
The prototype is made using Plex/Websydian as the development tool. The exact same functionality can be developed using 2E and/or RPG developer, but at the moment we do not have examples that demonstrate this.
Should you be using WebsydianExpress 2.0, you can do make the same functionality, but the exact implementation is a bit different.
To understand the example, you should download the local model containing the implementation of the example.
When a user logs in to WebsydianExpress, several session attributes are affected. After the session has been updated, the site is reloaded, using the new session attributes.
The session attributes are:
1. User
2. Roles
3. Folder list
4. Session timeout
When an external system is used for authentication, the end-result of the authentication process must be that these session attributes are set.
Which information the external system will be able to provide will vary from case to case, but in almost all cases the external system will contain user information - and in many cases the external system will have a role concept that can be mapped to the WebsydianExpress roles.
It is unlikely, although not impossible, that an external system will have information about the folder list and the timeout that should be assigned to the session. But this is not a problem as the WebsydianExpress runtime provides functionality for determining the folder list and timeout based on the roles assigned to the session.
For more information about how the session attributes are updated when users login please read Users and Roles.
The example shows how to implement a solution where an external system is used to check the user and password. The external system will provide information about the roles assigned to the user in the external system.
The login must be made without showing a login panel. This shows how you can handle the situation, where the user credentials are provided by some kind of front-end application.
The information about the user and password will be added to the initial request used to access the application.
For the purpose of this example, a very simple authentication system has been created. It offers a service "AuthorizeSession" that accepts two input parameters: Login and Password.
AuthorizeSession returns a flag indicating whether the user credentials (login and password) are valid. In addition to this flag, the service returns a list of up to 20 roles assigned to the user.
This service has been implemented in the function: SimpleAuthorizationSystem.AuthorizeSession. To keep the example simple, the system will consider all requests where both the login and password are specified as valid.
It is assumed that the external system uses the login as the unique identification of the user.
The service returns a role name - this is the name of the role in the external authorization system.
As mentioned above, the external authorization system returns a set of roles that the specified user is authorized for. However, not all of these roles are necessarily relevant for the WebsydianExpress site - and there is no way to be certain that the roles has the same name in the external system as in the WebsydianExpress site.
To show how this situation can be handled, the example shows how you can use the WebsydianExpress custom fields to specify the name each role has in the external system. After calling the AuthorizeSession function, you will then the role that has a custom field with the name specified by each role name returned by AuthorizeSession - these are the roles that will be added to the session.
If the names of the roles in the external system is the same as in the WebsydianExpress site, you do not have to use custom fields - instead just call the API APIServer.Role.GetByName to get the unique identification of the WebsydianExpress role - and then use this to add the role to the session.
All of the functionality will be placed in a function SimpleAuthorizationSystem.SessionAfterCreate. This inherits from abstract callback function for the SessionAfterCreate callback point: Callback.WebServer.SessionAfterCreate.AbstractCallbackFunction.
Note that in version 3.0 and later, you have to declare the callback function in the administration interface - see the section "Setting up the example in the administration interface" for information about how this is done.
SessionAfterCreate is called immediately after a session has been created. This offers the opportunity to change the session attributes before the site is loaded.
SimpleAuthorizationSystem.SessionAfterCreate is described in detail in the rest of the section.
To bypass the login page, the user credentials (login and password) has been added to the initial request, which will have the format:
http://www.websydian.com/express/site/basicsite?SSOLOGIN=ASN&SSOPWD=ABC
The function SimpleAuthorizationSystem.SessionAfterCreate.GetRequestInformation retrieves the login and password from the request.
This is done by inheriting from PopulateWebInput, and adding two fields with the implementation names SSOLOGIN and SSOPWD to the WebInput variable.
The retrieved values are returned as the output for the function.
The data retrieved from the request are used as parameters for the call to the "AuthorizeSession" service.
If the external system does not recognize the user credentials the callback function is terminated. This has the effect that the session will keep the roles that was assigned when it was created.
The rest of the functionality will only be performed if the user has been authenticated by the external system.
The session should be updated with the user who has logged in. This is done by writing a unique identification of the user in the WebsydianExpress user table to the session. However, as the user information belongs to an external system, the user might not exist in the WebsydianExpress user table.
So to make it possible to store user information on the session, it is necessary to use the WebsydianExpress user table as a mapping table to the user in the external system.
To make this possible, a record is created in the WebsydianExpress user table containing the unique identification in the external system in the Login field. Before creating the record, it is checked whether the record already exists.
The user is updated on the session using the APIServer.Session.Update function.
The user is created as an inactive user, as it should not be used to perform a manual login using the WebsydianExpress authorization system; it is only used to provide a key for reading the user data in the external system.
Before adding any roles to the session, the roles assigned as part of the session creation is removed using the APIServer.Session.RemoveAllRoles API.
The AuthorizeSession service returned an array containing the roles that is specified for the user in the external system. This array is read record by record and each role is handled as described below.
There is no reason to assume that all the external roles correspond to WebsydianExpress roles and there is no reason to expect that the roles that corresponds to WebsydianExpress roles has the same name (ID) in WebsydianExpress and the external system.
To provide a mapping of the roles, and a way to identify the relevant roles, a custom field has been specified for the role entity. This custom field has the name EXTERNALNAME. This makes it possible to use the WebsydianExpress administration interface to specify the external name for each WebsydianExpress role that the external system may assign.
So for each role returned by the external system, the corresponding WebsydianExpress role is found using the APIServer.CustomField.GetInstancesForValue API. If no corresponding WebsydianExpress role is found, the returned role is disregarded.
The WebsydianExpress role is added to the session using the APIServer.Session.AddRole API.
From WebsydianExpress version 3.0, the session timeout is determined by the roles that is assigned to the session. So after changing the assigned roles, you must refresh the timeout.
This is done using the APIWebServer.Session.RefreshSessionTimeout API.
The external system has no information about folder lists, so the folder list is just assigned to the session based on the roles assigned to the session.
This is done using the APIServer.Session.RefreshFolderList API.
This step will instruct the WebsydianExpress runtime that the function SimpleAuthorizationSystem.SessionAfterCreate must be called when the callbackpoint SessionAfterCreate is reached.
Note that as soon as you add a callback function to a callback point, it will be called when the WebsydianExpress reaches the callback point. This means that you should not add the callback function until you have deployed the program to the site.
In the administration interface, select the menu item Site configuration→Callback Functions. In the drop down box, select SessionAfterCreate and press Insert.
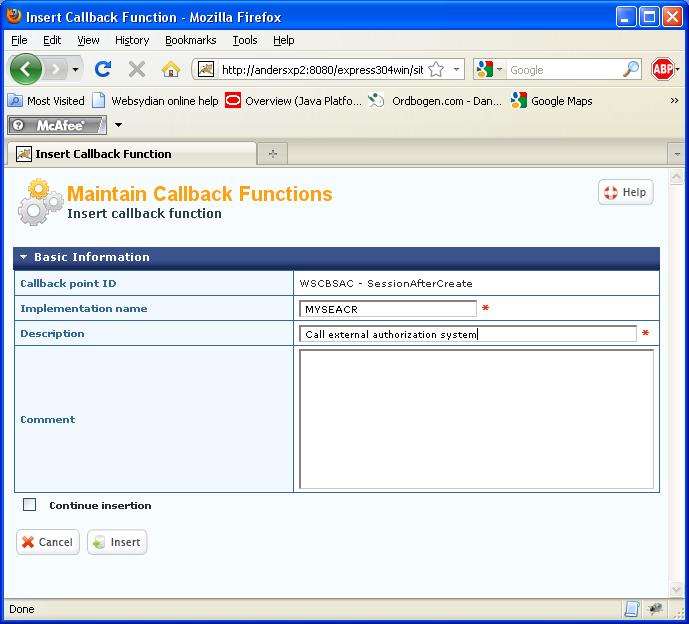
For the field Implementation name, specify the implementation name of the function SimpleAuthorizationSystem.SessionAfterCreate.
Press Insert to add the function to the callback point.
This step will make it possible for you to map the name of a role in the external authorization system to the name of the role in the WebsydianExpress site.
The first step is to add the custom field to the role entity.
In the administration interface, select the menu item Site configuration→Custom Fields. Press Insert.
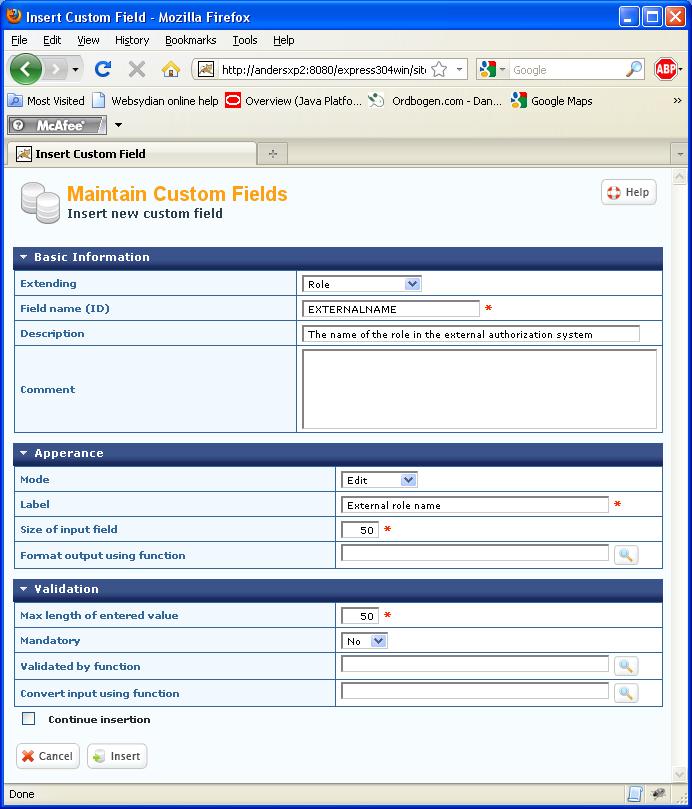
Select Role in the Extending drop down.
Specify EXTERNALNAME in the field name (This is the name used for the custom field name when calling the APIServer.CustomField.GetInstancesForValue API).
The last step is to update the roles with the external names.
In the example, we will only update the User role - but in a real life situation you would probably define external names for a number of roles.
In the administration interface, select User management→Roles. Press Update for the User role.
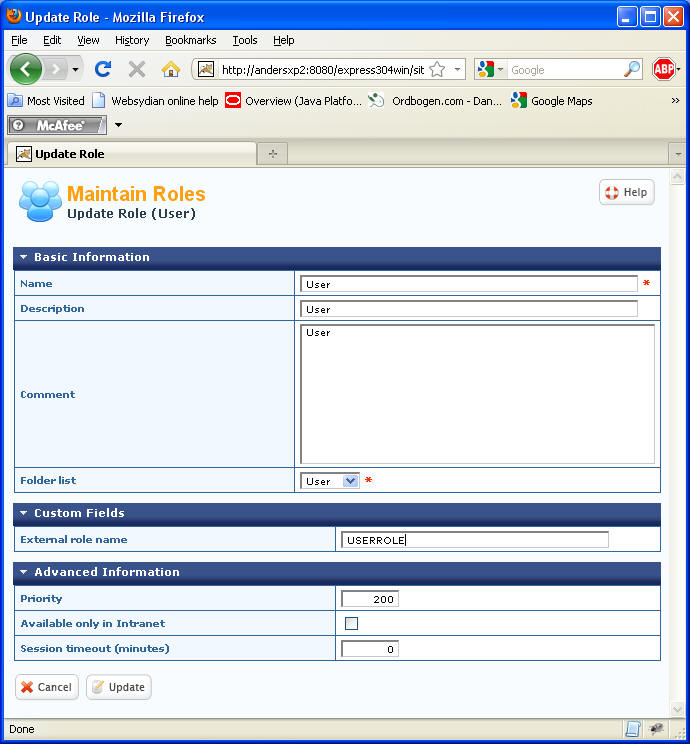
You will see that an additional field occurs on the role maintenance page. This is the result of adding the custom field to the role entity.
Specify USERROLE as the value of the External role name.
Press Update.
Generate and build the callback function SimpleAuthorizationSystem.SessionAfterCreate. Deploy it in the WebsydianExpress installation. As noted above, this should be done before adding the callback function to the callback point in the administration interface.
In the address field of you browser, enter the URL of your site, followed by the ?SSOLOGIN=TESTLOGIN&SSOPWD=ABC
e.g. www.websydian.com/site/basicsite?SSOLOGIN=TESTLOGIN&SSOPWD=ABC.
This should load the site in the state it would have when a user has logged in - e.g. the menu item Logout should be shown instead of Login.
If this does not happen, start by checking the message log (administration interface Utilities→message log) - in most cases this will contain a message describing the problem.
Another thing to investigate is whether the user TESTLOGIN has been created.
Users and Roles - Describes the WebsydianExpress authorization system.
Custom Fields - Describes how you can use custom fields to extend the role entity.
How to use callback functions - Describes how you can use callback functions to change the normal functionality of WebsydianExpress