 Online
documentation - WebsydianExpress v3.0 Online
documentation - WebsydianExpress v3.0
|
Quick Text
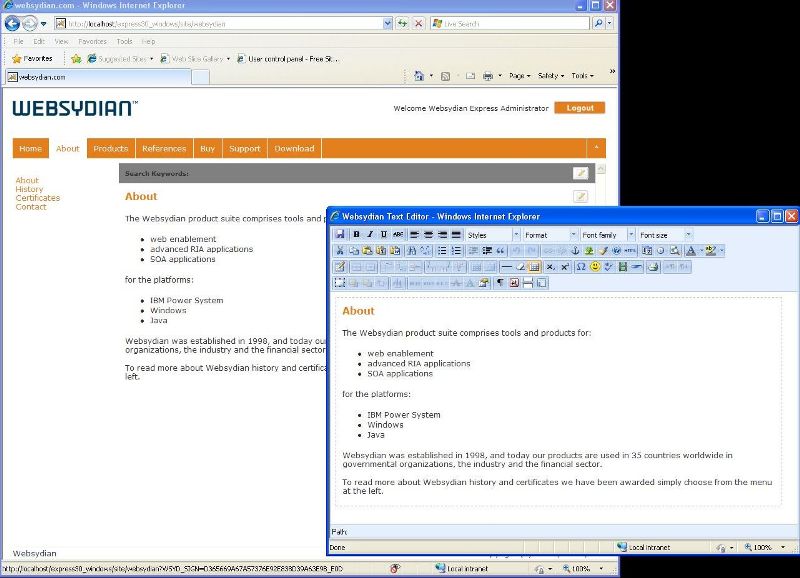
Quick Text is an example for WebsydianExpress showing some of
the more advanced ideas of Websydian and WebsydianExpress
development. The idea of Quick Text is to enable you to add
customizable text to any page in your WebsydianExpress site and
allow specific users to edit these texts using a WYSIWYG editor
(TinyMCE).
Some examples could be:
- Implement a general help system for your WebsydianExpress
application by adding an help region on your pages controlled by
Quick Text
- Add a comment box to any page of your WebsydianExpress
application
- Add pages with text content e.g. for an About page
In order to setup Quick Text you will need a basic understanding
of HTML and WebsydianExpress along with the idea of dynamic
PageGenerators and menu services.
A set of HTML templates are provided to show you the different
possibilities.
Quick Text is delivered "as is". We do not provide support for
usage, configuration, your further development of it etc. You will
be able to download the Plex model below for changes and you are of
course welcome to suggest any improvements to Quick Text.
Currently Quick Text runs under WebsydianExpress v3.0.2 and
later.
Installation
- Before proceeding make sure you are running WebsydianExpress
v3.0.2 or later
- Download the Quick Text zip file that suites your variant of
WebsydianExpress:
- WebsydianExpress for Java (QuickTextForJava.zip)
- WebsydianExpress for Windows (Contact support)
- WebsydianExpress for iSeries (Contact support)
- WebsydianExpress for Windows/iSeries (Contact support)
- Expand the content of the ZIP file to a location on your
disk.
- Copy the content of the library html to your WebsydianExpress
html library.
- Depending on your variant of WebsydianExpress deploy the
runtime objects by:
- WebsydianExpress for Java
Copy the QuickText.jar
file of the library lib to the WEB-INF/lib directory of your
WebsydianExpress for Java instance in your servlet engine, and
restart your servlet or servlet engine.
- In the WebsydianExpress administration interface proceed to the
Maintain Site Structure
- Select the root element of your site structure and press the
import button
- Select the QuickText_Import_File.txt file located in the zip
file directory then press upload and press import to get the
required information into your site.
- Create a new folder named QuickText pointing to the html
directory created in step 4 use the resource location, css and js
files of your site.
- Add the new folder to your folder lists at the bottom of each
folder list.
Configuring the Quick Text Examples
Add the Quick Text examples to your site
- In the Maintain Site Structure select a menu loader of your
site and add the three examples menu items supplied with Quick Text
- Press Add -> Select "Refer existing site element" ->
Press Next
- Search for Quick -> Select Quick Text Example 1 -> Select
a sequence and frame -> Press Finish
- Perform the above two steps for each Quick Text Examples
supplied
Who is allowed to edit
- By default you are only allowed to edit the Quick Text elements
if you have the Administrator role, in order to change the roles
for editing do the following:
- In the Maintain Site Structure expand the Quick Text element
scoped to your site root.
- Select the element Quick Text Editors and press Roles -> Add
or remove the roles to reflect your requirements and press
Apply
Check out the examples
- Go to your site and locate the menu where you added the Quick
Text examples
- Select one of the Quick Text examples
You should see a blank page no text available.
- Now login with a user having the correct set of roles for
editing Quick Text elements
- Now select one of the Quick Text examples
You should see one or more edit buttons on the right hand of your
display.
- Press the edit button
You should now see a new window giving you a WYSIWYG editor
- Add some text and press the top most left hand side button (The
save icon) and press the close icon at the top of the window.
The text entered should appear on the screen.
Quick Text consist of the following components
The dynamic PageGenerator (WSSTCDC) - Show Quick Text element
and allow editing if authorized
This is the main component of Quick Text this is the dynamic
PageGenerator you can add to any page in your WebsydianExpress
application.
To do this add the following code to the page:
<div id="info">
/(CHILDFNC-WSSTCDC?WSST01=GeneralInfo&WSST03=info)
</div>
The above code show that we want to place a DIV section called
info. The file that the business process is to retrieve (and
save) text from is called GeneralInfo.htm. We must also tell
the business process the name of the DIV. This is needed, at the
editor will, every time the user clicks the Save
button, update the text in this DIV.
The dynamic child pagegenerator WSSTCDC have the following
parameters:
| Field |
Optionally |
Description |
| WSST01 |
Mandatory |
Name of the file that the text will be read from and saved to
on the application server. |
| WSST02 |
Optional |
Suffix for the templates that displays the text and the editor
itself. Can be used to overwrite behavior of display and editing.
See Quick Text example 3 |
| WSST03 |
Optional |
Identification of the DIV where the text is displayed. Used for
the WYSIWYG editor to automatically update the content on the page
being edited without having to refresh the page. |
| WSST04 |
Optional |
Suffix for name of file that the text will be read from and
saved to on the application server. |
Please note.
The purpose of the field WSST04 is, that when you use a child
replacement marker ( /[field name] ) then it is not possible to
concatenate a constant or another field to the first one. Take a
look at this example where we what to take the value in the field
WS5yc6eA and concatenate the constant _wholesale:
<!-- This will not
work! -->
/(CHILDFNC-WSSTCDC?WSST01=/[WS5yc6eA]_wholesale&WSST03=info1)
Instead you must use the WSST04 field like this:
/(CHILDFNC-WSSTCDC?WSST01=/[WS5yc6eA]&WSST03=info1&WSST04=_wholesale)
Below is an example where the text is displayed in a box on the
page:
<div id="terms" style="background:#FFFEEC;
width:100%; position:relative; float:none; padding:2px;
margin-bottom:10px; border:1px solid #FFD682;">
/(CHILDFNC-WSSTCDC?WSST01=Terms&WSST03=terms)
</div>
You can design the DIV section as you like to have the text
shown nicely.
The PageGenerator (WSSTCEP) - Show and handle Quick Text
editor
This is the PageGenerator handling the displaying of the editor
to be used and allow editing and saving of the Quick Text
element.
The PageGenerator (WSSTCP) - Show a page with Quick Text
elements
This PageGenerator is part of a business process that enables
you to add pages to your WebsydianExpress site where you would like
to allow editing of standard pages with text.
These pages could be Contact or About pages where you would
allow users to change the content without having to open the HTML
file of your site.
Where are the Quick Text elements saved
The Quick Text elements are all saved as files on your
application server in the library Static located in your html
library of your WebsydianExpress instance.
Model is included in the zip file downloaded in the library
model.
- TinyMCE homepage at http://tinymce.moxiecode.com/index.php
- TinyMCE homepage
- TinyMCE documentation at
http://tinymce.moxiecode.com/index.php
- Documentation for TinyMCE
- Site structure
- Reference documentation on site structure
- Roles
- Creating and assigning roles
- Alias
- Creating and assigning alias
-
Dynamic Child PageGenerator
- Information about Dynamic Child PageGenerator
- Menu Services
- How to use Menu Services