|
|
This document will describe how you can create a WSDL based on the definitions you have made in the WebsydianExpress service structure.
The document will contain a description of the steps you need to perform to create the WSDL - and it will be exemplified by how you would be able to do these steps for the "greet" service that is exposed as an example service in the demosite.
A WSDL file must contain formal definitions of the request and response documents for all the functions you provide information for in the service.
So to be able to create a WSDL file, you must start by creating these formal definitions - in the form of W3C schemas.
The service structure in WebsydianExpress contains the information about each operation you make available (in the form of the service handlers). However, you do not have any information about the request and response documents used for these operations.
So the first step you need to do is to create these schemas.
If you have defined the request and response documents using TransacXML definitions, you can create the schemas by following this guide:
The result of this will be files containing the schema definitions for the request and response documents. If the top elements of several documents are in the same namespace, you can have the definitions in a common file.You do of course also have the option of creating these definitions manually - or by using a tool like XMLSpy to generate a schema based on an example document.
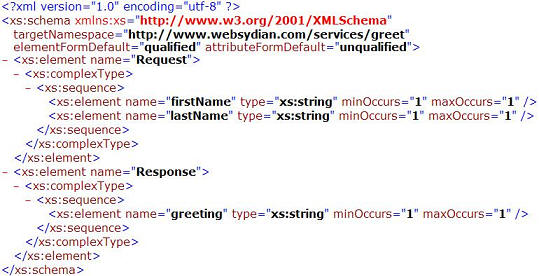
For the example greet service, this is an example of a schema file that describes both the request and the response document:
After generating the service handler, you must specify the schema information for the service handlers.
In addition to the schema information, you must also specify the name of the operation that the service handler will have in the WSDL file.
You do this by going to the service structure in the administration interface. Press the "Handlers" button.
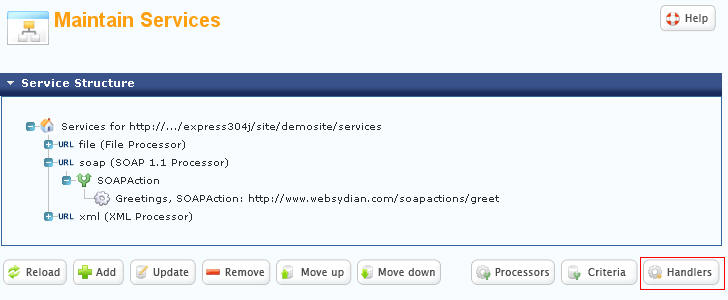
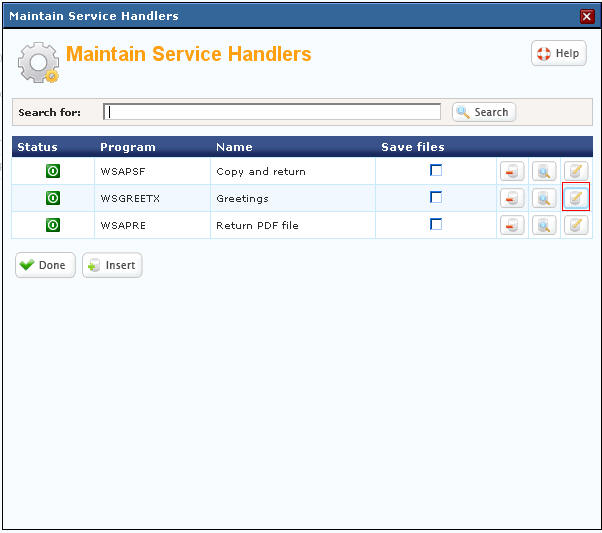
Press the update for service handler you want to update the information for - in this case for the greet service:
Start by specifying the name the of the WSDL operation that will model the service handler.
This name can be valid WSDL operation name - it is recommended that the name in some way describe the service.
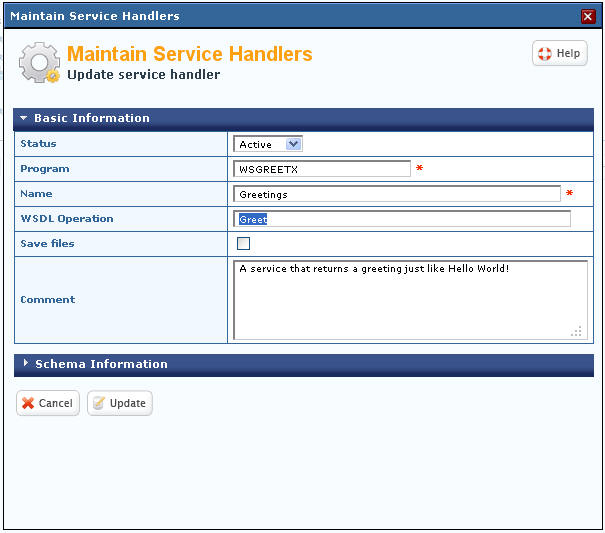
Then open the Schema Information section by pressing the blue Schema Information bar just above the Cancel and Update buttons.
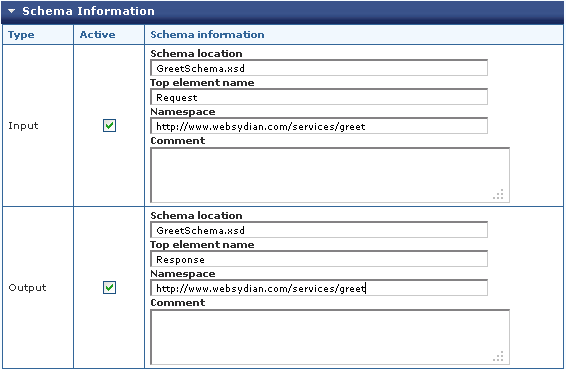
The schema location is not resolved when the wsdl is created - so you can even specify the name of a file that does not exist.
What you specify in the Schema location field is what the WSDL will contain in the import statement for the schema.
This means that if you just specify the name of the schema - and then deploy the schema file in the same folder as the WSDL file - the reference will work. Otherwise, you will have to specify a relative reference. The reference must be relative to the location where you will deploy the WSDL.
In the example, I have created a file named GreetSchema.xsd containing the content for both the Request and the Response (as they are in the same namespace, this is the most obvious way to do it). I will deploy this is the same folder as the WSDL.
After specifying this information (and the WSDL operation), press "Update".
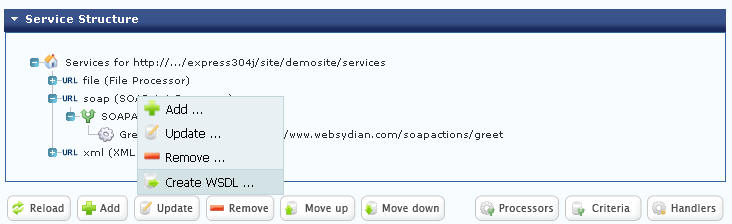
You can either select to create a WSDL file for all functions that is exposed under a SOAP 1.1 processor - or for a specific functions.
In this case, the processor only scopes one service - so the resulting file will be that same no matter what you select.
To create a WSDL for all services for a processor:
Go to the service structure - select the soap processor, right-click and select Create WSDL
To create a WSDL for one specific service:
Go to the service structure - select the service handler, right-click and select Create WSDL
The following processing will be the same no matter which option, you choose.
You will be asked to specify a location for saving the file (the exact panel and behavior can be browser dependent):
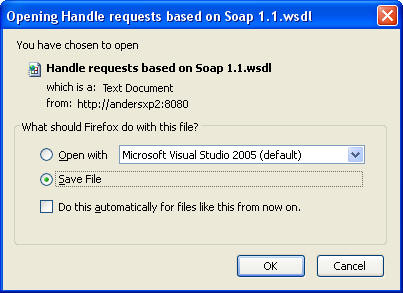
Select Save File, and specify a suitable name for the WSDL.
<?xml version="1.0" encoding="utf-8"?>
The current way to define the WSDL has one issue:
When the WSDL is created, the URL specified for the services and target namespace will be the one that the user has used to access the site.
This is not necessarily the one the end-users will use - the WSDL might be generated from a development environment - or the user might specify a url that can't be used by external users.
E.g. if the user has the service installed on his own PC, he might use a URL: http://localhost/express30/site/demosite to access the site. This will of course not be useable for external users.
Another thing the WSDL creation isn't able to is to find out which port the service is exposed on - so if the service is not available on port 80, you must also specify the correct port in the URL
To avoid this issue, you should check whether the following entry is correct (at the bottom of the WSDL):

The location attribute specifies the URL where the subscriber must access the service - so this must be changed to the correct one for an external user.
This change is critical - unless you have used the external URL to access the site - and the service is provided on port 80.
The other thing that will have a reference to the URL entered by the user is the target namespace specified for the WSDL and for the top schema used in the WSDL:
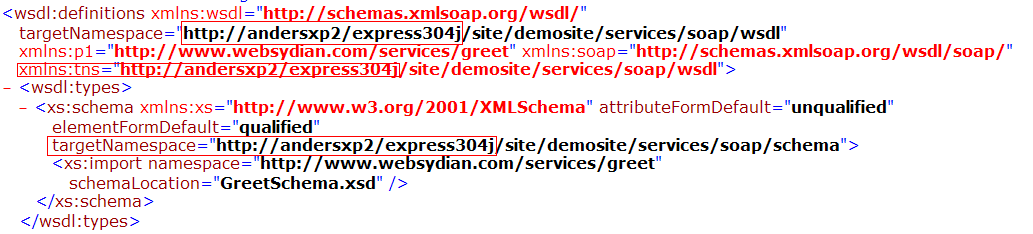
This is not critical as such, as the namespaces just have to establish uniqueness - and really shouldn't have any influence on the functionality of the subscriber using the WSDL.
However, using the local name of the server or using the name of the test server in the namespace might be confusing - so it is recommend to also change these values.