|
|
Changing the authorization system from authorization levels of version 1.x to role-based authorization means that even though it is possible to make users, site elements etc. available in the 2.0 site, roles needs to be assigned to users and site elements before the 2.0 site is usable.
This can be done as a manual process, but especially the assignment of roles to the users can be a major task if there are many users defined for the 1.2 site.
To avoid or lessen the impact of this, the export tool used for the upgrade of 1.2 sites to 2.0 provides the option to convert the authorization levels into roles and to assign these roles to users and site elements.
This document describes the functionality of this process, the rules you can specify for the assignment of roles, and the effect of this assignment on the resulting 2.0 site.
To fully understand this conversion, you should have at least a basic idea about how the role-based authorization works.
An overview can be found in this description of the role-based authorization.
Before assigning roles to users and site elements, the roles must be created. This is done by the export tool.
This simple case will be used to exemplify the conversion of authorization levels and the assignment of roles to users and site elements.
Maximum extranet level in the 1.2 site = 200.
| Authorization levels in 1.2 site | Roles in 2.0 Site after Conversion | |
| 900 | Administrator | Administrator (Priority = 900, IntranetOnly=Yes) |
| 400 | Super User | Super User (Priority = 400, IntranetOnly=Yes) |
| 200 | User | User (Priority = 200) |
| 100 | Anonymous | Anonymous (Priority = 100) |
| Authorization levels in 1.2 site | Folder lists in 1.2 site | |
| 900 | Administrator | Administrator |
| 400 | Super User | |
| 200 | User | User |
| 100 | Anonymous | Anonymous |
In the 1.2 site, all administrators will use the Administrator folder list when they log in - all others will use the User folder list when they log in, while the anonymous sessions will use the Anonymous folder list.
To mirror this in the 2.0 site, the roles will get the following folder lists:
| Roles in 2.0 Site after Conversion | Folder list assigned to the role |
| Administrator (Priority = 900, IntranetOnly=Yes) | Administrator |
| Super User (Priority = 400, IntranetOnly=Yes) | User |
| User (Priority = 200) | User |
| Anonymous (Priority = 100) | Anonymous |
When you use the export tool to generate the export file, you can specify two different options ("Roles for each User" and "Roles for each site element"). These options determines how the roles are assigned:
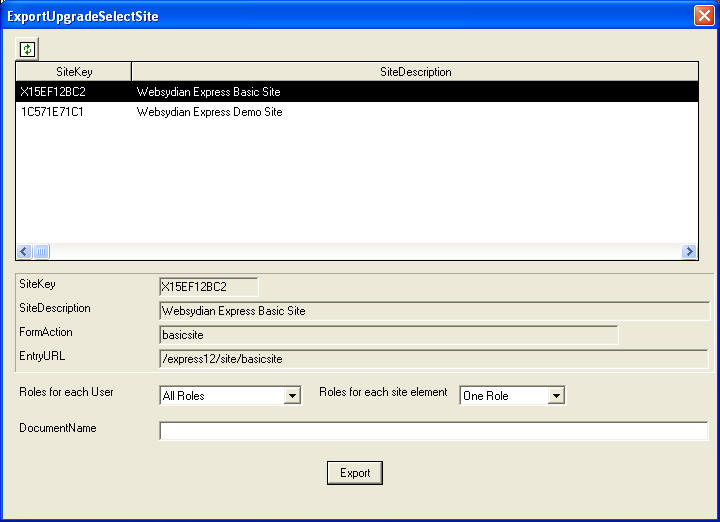
The effect of each combination of settings is described and exemplified in this section, the first three cases are described in some detail, as these are the selections that will result in a functional site.
The number of options and their effects might seem a bit overwhelming. If you find it hard to get a grip on the different possibilities, just read the first section (Users: All Roles, Site Elements: One Role) to get an idea of how the roles are assigned in this case.
After that just use these settings to create the export file. Import this file into the 2.0 installation as described in the guide, and see if the effect is what you want.
If not, the issues you encounter might give you an idea about what you can use the other options for.
This is the default setting as these settings will give you a 2.0 site that as closely at possible mirrors the functionality of the 1.2 site.
By selecting these settings, roles will be assigned as follows:
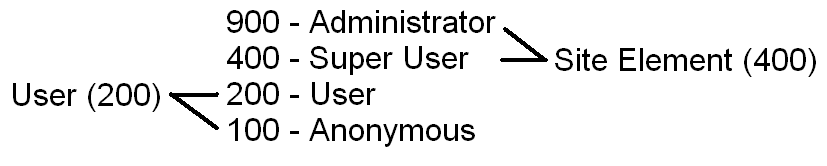
This means that if we look at the example where the user has authorization level 200 - and the site element has the authorization level 400 - this is the assignment of roles that will be made:

The user will get the User and Anonymous roles, while the site element will get the Super User Role.
As the user and the site element has no common roles, the user is not authorized for the site element just as the case is when using the authorization levels.
The case where the user has the authorization level 200 and the site element has the authorization level 100 will be resolved as follows:

In this case, the site element gets the Anonymous role.
This means that now the user and the site element has a common role so the user is authorized for the site element.
In the last case, the user and the site element both has the authorization level 400.

As the user and the site element both has the authorization level 400, the user is authorized for the site element.
Note however, that the role Super User is set to IntranetOnly = Yes. So if the user logs in to the application from out side the intranet, the "Super User" role will not be assigned to the session, so in these cases, the user will not get access to the site element. Again, this is just like when using the authorization levels.
As mentioned above, this is the default setting for the assignment of roles. This selection results in a site, where the behavior should be extremely close to the 1.2 site.
The downside of this way to assign the roles is that the users get a potentially large number of roles and at least the assignment of the "Anonymous" role to users can be somewhat hard to explain/understand (one way to get around this could be to rename the role to "Everyone" in the 2.0 site).
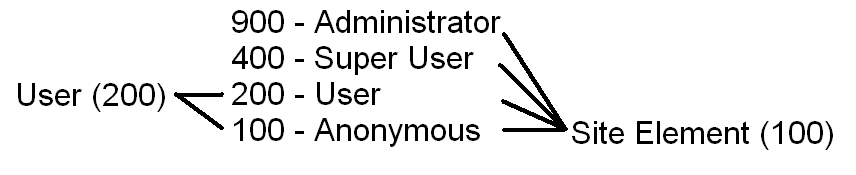
So when the user has the authorization level 200, and the site element has the authorization level 400 the assignment of roles will be as follows:

There are no common roles so the user is not authorized for the site element.
The case, where the user still has authorization level 200 and the site element has authorization level 100.

"User" is a common role so the user is authorized for the site element.
And finally, the case where both user and site element has authorization level 400:

The user and site element has a common role so the user is authorized for the site element. As the "Super User" role is IntranetOnly=Yes, it will only be assigned for intranet sessions, so the user will not be authorized for the site element if he logs in from the extranet.
The benefit of using these rules for assignment of roles is that fewer roles are assigned to the users. Especially the fact that no users will get the "Anonymous" role seems right. As the number of users normally will be quite a lot higher than the number of site elements it should minimize the number of manual changes needed to get final assignment of roles just as you want it.
There is of course a downside to this selection too. Using the authorization levels to control the authorization meant that you would very often need to place two menu items on the same position in the menu, and then let the authorization level decide which one should be shown.
The most common occurrence of this is the login and logout menu items. Below, this case will be used as an example showing the issue with this selection.
The case as it is implemented in the 1.2 site:
The login menu item has the authorization level 100 and the logout menu item has the authorization level 200. The login menu item must be shown to sessions having authorization level 100, but not to session having the authorization level 200.
This is done by placing the two menu items in the same menu, with the same alignment and sequence. This means that as long as the authorization level of the session is below 200, only the login menu item will be shown, while sessions with the authorization level 200 or higher actually will be authorized for both menu items, but as they occupy the same place in the menu, only the logout menu item is shown, as it has the highest authorization level.
When we compare the two ways of assigning roles described above, this situation will look as follows:
Users: All Roles, Site Elements: One Role - Anonymous Session

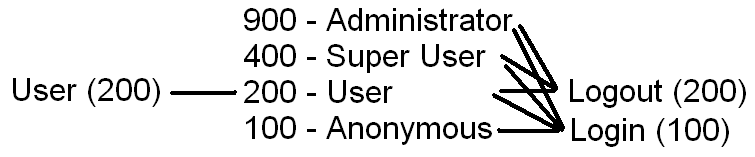
Users: One/Two Roles, Site Elements: All Roles - Anonymous Session
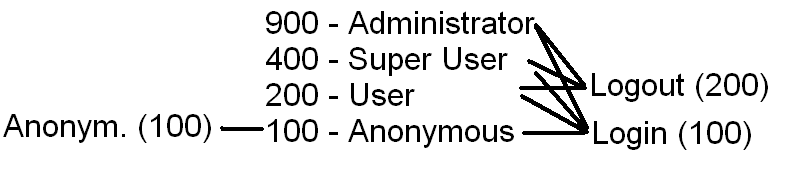
In both cases, the anonymous session will only be authorized for the Login menu item, so this is of course the menu item that will be shown.
Users: All Roles, Site Elements: One Role - User logged in with level 200

Users: One/Two Roles, Site Elements: All Roles - User logged in with level 200
In both cases, the user is authorized for both site elements. In these cases, the role-based authorization system compares the priority of the roles that the user and the site element has in common:
Users: All Roles, Site Elements: One Role - common roles:
For Logout - User (priority 200)
For Login - Anonymous (priority 100)
Based on this, the runtime will determine that the Logout menu item should be shown. This is the exact same behavior as in 1.2 installations (using the authorization levels).
Users: One/Two Roles, Site Elements: All Roles - common roles:
For Logout - User (priority 200)
For Login - User (priority 200) and Anonymous (priority 100).
In this case the highest priority of a common role is the same for both site elements (User - priority 200), so the runtime has no way to control the selection. In this case it is random which menu item will be shown. This is not the same behavior as the 1.2 installation.
You can of course still select to assign "One/Two roles" to the user and "All roles" to the site elements, this just means that after performing the import, you have to go through the site structure and remove some roles for site elements when they occur in situations like the one described (same alignment/menu sequence for child elements of menu site elements, same frame name for child elements of frame elements, or if you have more than one site root).
The necessary changes in the example would be to remove the roles User, Super User, and Anonymous from the Login menu item.
The final result after making the manual changes would be like this:
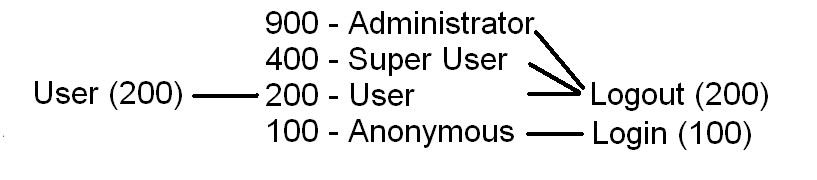
Now "User" is not authorized for the Login site element any more, so the menu item for the Logout site element will be shown instead.
This selection is a bit special. You should get a functioning site out of the upgrade, but the number of roles assigned to users and site elements will be unnecessarily high. However, in some special cases this might be the easiest setup for a later manual handling of the roles.
The example, where the user has the authorization level 200 - and the site element has the authorization level 400 will result in the following relations:
As there are no common roles, the user is not authorized.
The case, where the user has the authorization level 200 and the site element has level 100.
There are two common roles, User and Anonymous, so the user is authorized for the site element.
The final example, where the user and the site element has the authorization level 400:

As there is one common role, the user is authorized for the site element. Again, as the Super User role is an intranet role, the user will not be authorized if he logs into the site from the extranet.
This method has the problems described for each of the two preceding cases. The user gets a lot of roles (and among these will be the role Anonymous) and the selection, when there are two menu items for the same menu location, can't be correctly determined.
This does not necessarily mean that you should not select this combination, but you should at least consider whether one of the two previous would be a better solution.
Use this setting if you do not want any roles to be assigned to the users or to the site elements. You can do this if you want to keep the site structure and wants to keep the users but want to assign the roles manually.
The site will obviously not be accessible when you select these rules, but you can still access the administration interface for the site and assign roles to site elements and users.
Selecting this will in most cases mean that the site will be available for anonymous sessions (in some special cases, this might not be the case).
Users will be able to log into the site. But an error will occur as soon as they has done so, as they are not authorized for any site root elements, which means that the site can't be loaded.
Selecting this should mean that the site will be accessible for anonymous sessions, but as for the previous case, you will need to assign roles to the users before logging in.
The site will not be accessible. There are no obvious reasons for selecting this combination.
The site will be normally be accessible for anonymous sessions, but it is unpredictable what will happen when a user logs in.
The only reason for selecting this would probably be if you want to create a program for updating roles for the users and the site elements and in this context needs to know what the authorization level of the user and the site elements was in the 1.2 site.
The site will not be accessible as no site elements has any roles assigned.
Again, there is not really any obvious cases for this selection.