
Quick installation guide for Websydian Express for Windows
This guide provides everything you need to do in order to install Websydian Express for Windows, quickly.
Step 1: Check prerequisites
Windows
This version of Websydian Express requires Microsoft Windows 2000 Pro/Server, XP Home/Pro or Windows 2003 server.
SQL Server
This version of Websydian Express requires Microsoft SQL server 7.0, 2000 or 2005. If you do not have one installed we recommend installing the Microsoft SQL 2005 Express Edition.
Servlet Engine
A servlet engine is required to run Websydian Express. If you have not all ready installed a Servlet Engine we recommend installing the Apache Tomcat servlet engine.
Step 2: Obtain the latest version of the Websydian Express for Windows installation program
Current version and build is "Websydian Express v2.0 (#71001) for Windows"

Step 3: Install the Websydian Express components
Execute the installation program Express_v20_Windows.exe. That will start the installation process for installing and configuring the Websydian Express components.
- Press the Next button
- Select the location where you which to install Websydian Express
Press the Next button - Read and accept the license agreement of Sun
Press the Next button - Read and accept the license agreement of Websydian Express
Press the Next button - Verify the settings on how you will access Websydian Express from your
browser
If in doubt just leave the default settings
Press the Next button - Select the SQL Server where you which to install the Websydian Express
database
Press the Next button - Verify the settings of database connection and regional settings
If in doubt just leave the default settings
Press the Next button - Verify the settings to be used by the Websydian Server
If in doubt just leave the default settings
Press the Next button - Verify the settings to be used by the Application Services
If in doubt just leave the default settings
Press the Next button - Verify the settings to be used by the Web Server Component (Websydian Web
Server Component)
If in doubt just leave the default settings
Press the Next button - Press the Install button
The installation program will now perform the following tasks:
- Copy required objects to the hard disk at the location specified.
- Create database, tables, views and populate tables with information on the SQL Server
- Create shortcuts to commands that will start and stop Websydian Express in your Start menu
- Deploy the Websydian Web Server Component on the installed Tomcat servlet engine
During the installation you will be prompted to deploy the Websydian Web Server Component on your Tomcat make sure that you reply Yes to this prompt.
If you forgot to install Tomcat locally prior to running the installation program install Tomcat and run the program Pack.exe found in the library <Target Dir>\Web Server Component. Make sure that you leave all parameters unchanged and when prompted to deploy the Websydian Web Server Component on the installed Tomcat reply Yes.
Step 4: Deploy the Web Server Component, images and static html files (only required if not using Tomcat locally)
During the installation the installation program creates the required Web Archive file (WAR-file) to be used to deploy the Web Server Component servlet to the servlet engine selected.
Information about where to locate the WAR file to be used is displayed on the web page being generated by the installation program.
For information on how to deploy the WAR file please consult the documentation of the selected servlet engine.
Please note that if the hostname of the computer where the installation program is being run corresponds with the hostname of the Web Server Component and an instance of the Tomcat Servlet Engine has been installed the installation program will prompt the user for automatically deployment of the Web Server Component servlet.
Step 5: Start the Websydian Express service jobs
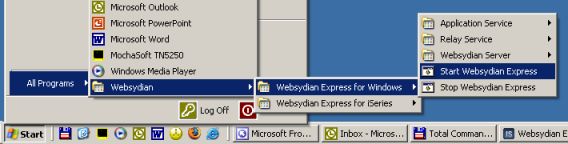
.
Starting Websydian Express for Windows

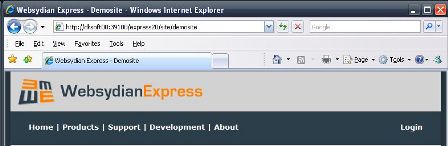
Step 6: Access the Websydian Express demosite and administration interface
http://<HostName>/express20/site/demosite
Make sure that you replace the '<HostName>' with the host name of your computer
Login with user Customer and password Customer to login to one of the sites and access the administration interface.
The web address used in this example is based on the default settings used by the installation program.
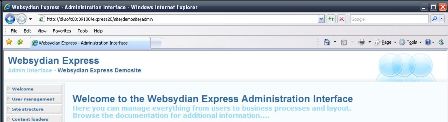
In order to access the administration part of the demosite append /admin to the url
http://<HostName>/express20/site/demosite/admin
Make sure that you replace the '<HostName>' with the host name of your iSeries
Login with user WSADMIN and password ADMIN in order to access the administration interface of the demosite.
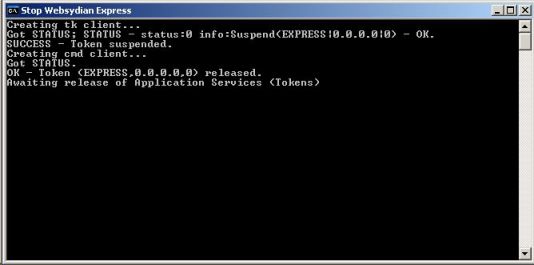
How to stop Websydian Express
Obtain a license for the Websydian Server
By default the Websydian Express is installed with an unregistered license of the Websydian Server providing 10 concurrent sessions.
You have the option to obtain a registered version for 10 concurrent sessions for free that enables you to find a starting point on the number of concurrent sessions required by your applications.
For pricing on concurrent sessions please contact info@websydian.com.
Uninstalling the Websydian Express
The following are the steps to complete in order to completely remove Websydian Express v2.0 for Windows from your system
- In the Tomcat directory locate the webapps directory and remove the express20.war file
- In the program files directory locate the directory Websydian and delete the directory named "Express v2.0 for Windows"
- In the SQL Server remove the database "WebsydianExpress20"
- In the Data Sources (ODBC) (Located in the control panel under Administrative tools) under System DSN remove the data source named "WebsydianExpress20"
Troubleshooting Websydian Express Installation
If you are having problems installing Websydian Express please contact Websydian support at support@websydian.com and attach the following information:
- The InstallFinish.htm document generated by the installation program.
- The Websydian Server log file.
To locate the Websydian Server log file go to the directory where you installed the Websydian Express, and open the subdirectory Websydian Server\logs. - The Web Server Component log file, which is located on your web server in the
directory specified during installation.
To locate your Web Server Component log file open the InstallFinish.htm document, go to the "configuration sheet" section and locate the value for "Web Server Component Log file".