|
|
This document describes the procedure for updating an existing site from version 1.2 to version 2.1.
In most cases, updating WebsydianExpress from one version to another should be a question of deploying new runtime objects and in most cases applying some changes to the administration interface (new/improved administration processes).
However, the change from version 1.2 to 2.1 includes two major changes that make it necessary to have a somewhat more complex upgrade procedure.
The first and most important change is that the authorization system has been changed from authorization levels to a true role-based system.
This is of course a high impact change, which means that information for each user, each site element and each folder list must be changed.
The other major change is the introduction of a separate administration interface for each site. Where the administration interface in version 1.x was an integrated part of the site structure, which the administrator had the possibility to change (and thereby also the possibility to accidentally make the administration site inaccessible), the administration interface in version 2.1 is a separate structure that can't be changed by the administrator.
These two changes makes it necessary to make major changes to the WebsydianExpress system database (new tables - and a lot of changes in existing tables).
The above issues makes it necessary to run an update tool on the 1.2 site so it will work in a 2.1 installation.
In order to limit the time frame where the WebsydianExpress site is inaccessible due to upgrade, the upgrade tool does not update the existing installation. Instead, the update tool is a two-step process:
Using this method means that the existing site is untouched by the upgrade, and it can be used while you are testing and changing the new version. It also means that you can make as many tests of the upgrade as you wish. This gives you the opportunity to test different settings to get the desired result.
The full upgrade process will be as follows (each step is described in detail below):
1. Install WebsydianExpress 2.1.
2. Make the user programs from the 1.2 installation available for the 2.1 installation.
3. Make the HTML templates from the 1.2 installation available for the 2.1 installation.
4. Install the export tool.
5. Create a new site in the 2.1 installation.
6. Use the export tool to export a site from the 1.2 installation to a file.
7. Use the import tool to import the above file into the site created in step 5.
8. Export registered events from 1.2 site
9. Import registered events to 2.1 site
10. Make any necessary manual changes to the new site in the 2.1 installation using the administration interface of the new site.
11. Copy web server resources.
Execute step 5 to 8 for each site you want to upgrade from version 1.2 to 2.1.
As you can see there are a number of steps involved in performing the upgrade but most of them are quite simple to perform.
As part of the update of the sites, all the unique identifications of the records in the files (the surrogates) will be changed.
For most of the entities, this is no problem, but for the user surrogate, this might be an issue.
The problem can occur if you have created a relation between the user surrogates and your own user tables. In this case, the update of the user surrogate will compromise the consistency of the database, as the relation between the WebsydianExpress users and your own user table will be destroyed.
If you have registered the user surrogate anywhere and need to make sure that a user surrogate for a user is the same after the update as it was before, you must contact Websydian Support.
Install the same variant (iSeries, Windows/iSeries, Windows) as you are using for your 1.2 installation.
We recommend that you place this installation on the same server as you are using for the 1.2 installation. This is not a requirement, it just makes it easier to share the resources between the two installations.
See the installation guide for version 2.1 for more information about the installation process.
With a few exceptions, you will not need to make any changes to your business processes (or to your own menu loaders/frameset loaders if you have created such).
However, if you have used any API's that uses authorization levels, you will have to change your code to use the version 2.1 API's. This is a separate task, which is not within the scope of this upgrade document.
So the main aim here is to make the objects you have developed for your 1.2 installation available for your 2.1 installation.
For the iSeries installations, you can choose to either:
or
There are other options, but the main aim is that all of the objects you have developed your self for the 1.2 installation must be in the library list used by the 2.1 jobs. The other important thing is that the 1.2 WebsydianExpress runtime objects from the 1.2 installation must not be used by the 2.1 jobs.
In this case there are two sets of objects from the 1.2 installation which you must make available for the 2.1 installation:
1. Windows objects (ProcessEntryPoints, PageGenerators, EventHandlers etc.)
2. Server programs and database files on the iSeries
For the Windows objects you can choose to either:
or:
For the iSeries objects, you will most likely want to reuse the existing libraries. Do this by adding any user libraries found in the library list of the EXPRESS job description of the 1.2 installation to the library list of the EXPRESS job description used by the 2.1 installation.
Make the objects from 1.2 available for the 2.1 installation by either:
or:
Apart from this, you will probably need to change the EXPRESS.ini file to connect to your user database (do not change the settings for the Express database)
You must also make the HTML templates used by the 1.2 application available for the 2.1 installation.
This is done by simply copying all of the template folders and templates scoped under the html folder in your 1.2 installation to the html folder of your 2.1 installation.
When asked about overwriting existing templates, answer yes to all.
This description only applies to the upgrade situation where you have just installed WebsydianExpress 2.1.
If you are upgrading a site into an existing 2.1 installation where you already have developed processes for other sites, you have to be more careful about overwriting existing templates.
The export tools is a small GUI applications that is used to generate the export file.
The tool are delivered in three different versions (iSeries, Windows/iSeries and Windows) and are installed as follows:
1. Install and start the Plex listener on iSeries. Contact Websydian Support if you do not know how to do this.
2. Unpack the the upgrade objects from the ZIP file ExpressUpgrade_1x.zip to a folder on the PC. ExpressUpgrade_1x.zip is located in the WebsydianExpress installation folder for version 2.1.
3. Modify the [Remote] section for the connection to the iSeries in the INI file for the export tool (WSUPGRADEXPORT.INI) so it looks something like this:
[Remote]
System=MyiSeries
Protocol=TCPIP
OpSys=AS400
Program=YOBSYRPC
Library=PLEX
Job Description=WXP12DB/EXPRESS
Buffer Size=4
Port=10056
UserId=USER_NAME
Password=
Code Page=101
Path=
TCPIP Dialog=0
4. Deploy the upgrade objects to the iSeries. The objects are packed in the save file xp12upg.savf and should be restored to the iSeries. If you restore the objects in the WebsydianExpress PTF library (default WXP12PTF) you can reuse the Express job description (as done in the example above).
You can test the installation by running the WSUPGRADEEXPORT.exe program.
All sites defined in the 1.2 installation must be shown in the grid for WSUPGRADEEXPORT.
The additional objects needed to export the information from the 1.2 site is placed in the ExpressUpgrade_1x.zip archive file that can be found in the installation folder for version 2.1 on the PC.
1. Unpack this in a folder of your choice on the server where the 1.2 installation is found.
2. Deploy the upgrade objects to the iSeries. The objects are packed in the save file xp12upg.savf that is found in the ExpressUpgrade_1x.zip file. Transfer the save file to the iSeries and restore the object to the PTF library for the 1.2 installation (default WXP12PTF).
3. Copy the [Remote] section of the Express.ini file for version 1.2 to the WSUPGRADEEXPORT.ini file (replace the content of the existing [Remote] section in the WSUPGRADEEXPORT.ini file).
You can test the installation by running the WSUPGRADEEXPORT.exe program.
All sites defined in the 1.2 installation must be shown in the grid for WSUPGRADEEXPORT.
The import tool is installed with the WebsydianExpress 2.1 installation and is found in the 'Application Service\WebsydianExpress' folder for version 2.1.
The export tool is included in a ZIP file and is installed with the Express 2.1 installation. The ZIP file, ExpressUpgrade_1x.zip, is located in the root installation folder.
To install the export tool please do the following:
1. Copy the export tool objects objects included in ExpressUpgrade_1x.zip to the PC running the 1.2 application.
2. Copy the section [ODBC-CON: WebsydianExpress] from the Express.ini file for version 1.2 to the WSUPGRADEEXPORT.INI file (replace the content of the existing [ODBC-CON: WebsydianExpress] section).
3. Edit the WSUPGRADEEXPORT.bat file so that the folder "C:\Program Files\Websydian\WebsydianExpress v1.2 for Windows\Application Service\WebsydianExpress" specified as the last part of the path is changed to the WebsydianExpress folder in your 1.2 installation.
You can test whether the ini-file are correct by running the WSUPGRADEEXPORT.bat file.
The grid for WSUPGRADEEXPORT must show all sites defined in the 1.2 installation.
The import tool is another small GUI application that is used to import the definitions created by the export tool into the 2.1 site.
The import tool is installed as part of the base installation of WebsydianExpress version 2.1 so you only need to change some settings before using the tool.
Modify the [Remote] section for the connection to the iSeries in the INI file for import tool (WSUPGRADEIMPORT.ini). The INI file is located in the "Import Tool" folder and it should only be necessary to modify the Port and Code Page entries.
You can test the configuration by running the the WSUPGRADEIMPORT.exe file.
All the sites defined in the 2.1 installation must be shown in the grid for WSUPGRADEIMPORT.
Copy the [Remote] section of the Express.ini file of the 2.1 installation to the WSUPGRADEIMPORT.ini file (replace the content of the existing [Remote] section in the WSUPGRADEIMPORT.ini file). The WSUPGRADEIMPORT.ini file is found in the ...Application Service\WebsydianExpress folder on the PC.
You can test the configuration by running the WSUPGRADEIMPORT.exe file.
All the sites defined in the 2.1 installation must be shown in the grid for WSUPGRADEIMPORT.
Copy the section [ODBC-CON: WebsydianExpress] from the Express.ini file for version 2.1 to the WSUPGRADEIMPORT.ini file (replace the content of the existing [ODBC-CON: WebsydianExpress] section) - the WSUPGRADEIMPORT files are found in the ...Application Service\WebsydianExpress folder found in the installed 2.1 folder structure.
You can test whether the ini-file are correct by running the WSUPGRADEIMPORT.bat file.
This step has to be performed for each 1.2 site you want to upgrade.
Enter the administration interface of the basicsite in the 2.1 installation and create the site that you are going to use for your upgraded 1.2 site.
Start the administration interface by entering the basicsite URL, followed by /admin (e.g. http://MyServer/site/basicsite/admin).
Use the user WSADMIN, password ADMIN to log in.
Start the Create Site process by pressing the "Sites→Create Site" menu item.
The grid for WSUPGRADEIMPORT must show all the sites defined in the 2.1 installation.
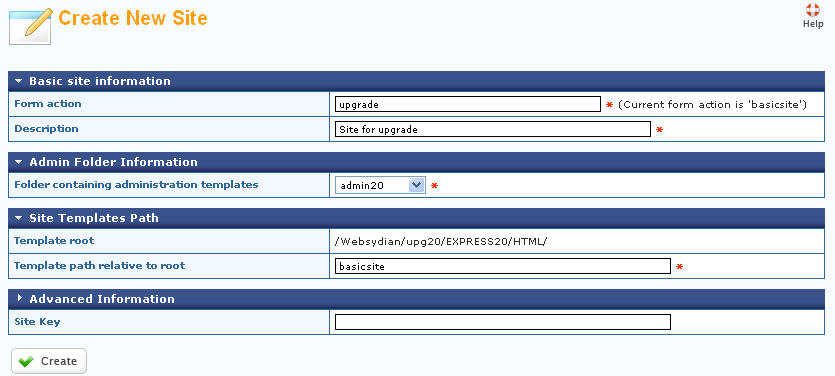
Form action:
This is the part of the URL that will specify which 2.1 site to access. After performing the upgrade, you can change this setting using the "Site Settings" administration process in the new site.
Description:
This text will be overwritten as part of the installation - so you can enter any value.
Folder containing administration templates
Select the admin20 folder. This folder contains all of templates used by the separate administration interface.
Template path relative to root
Specify basicsite (this is where the templates used for the new site will be found).
Site Key
Press the "Advanced Information" bar to see this field.
This is the unique identification of the site. Among other things this is used to identify the site when calling API functions.
If you have used the site key to store site specific values, then you should specify the site key from the 1.2 installation in this field. Otherwise just leave the field blank and a default site key will be generated.
For more information about the Create Site process:
When the site has been created a success page will be shown.
After this, you can see the site in the "Sites overview" page in the administration interface.
Pressing the link shown in the administration column (in this case /express20upg/site/upgrade/admin) starts the administration interface for the new site.
You can use the user WSADMIN, password ADMIN to log in. This administration interface will be unchanged during the upgrade as well as the WSADMIN user will be unchanged. This means that you will at any time be able to get into the administration interface using this link - even if the upgrade process has resulted in an error.
Run the WSUPGRADEEXPORT.exe file.
The panel shown below is launched.
Run the WSUPGRADEEXPORT.bat file.
The panel shown below is launched.
Select the site to export in the grid. The output values shown in the detail part of the panel changes based on the site selected in the grid.
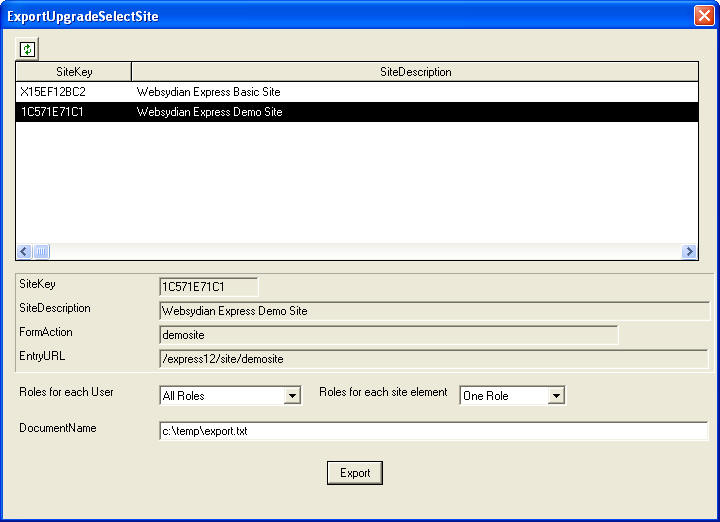
The two drop down boxes "Roles for each User" and "Roles for each Site Element" are used to control how the roles are assigned to users and site elements respectively.
Specify the path and filename of the export file (if the file does not exist, it will be created, however the path must be valid or an error will be returned).
Press "Export" to perform the export. This takes a moment (very much dependent on the number of registered users and the complexity of the site).
If you have selected a combination of rules that will make the imported site inaccessible for the user without manual changes, a warning message will be shown:

Pressing "Yes" performs the export, while "No" or "Cancel" terminates the export.
When the export has been performed, a dialog message will inform you about the result e.g.:
In case of errors or warnings, you can find more information about the errors in the message log of the 1.2 site.
When this is done, the export file has been created based on the definitions in the 1.2 site and the selected rules for assigning roles.
Run the WSUPGRADEIMPORT.exe file found in the 'Application Service\WebsydianExpress' folder of the 2.1 installation.
The panel shown below is launched.
Run the WSUPGRADEIMPORT.bat file found in the 'Application Service\WebsydianExpress' folder of the 2.1 installation.
The panel shown below is launched.
Select the new site created in step 4 in the grid:
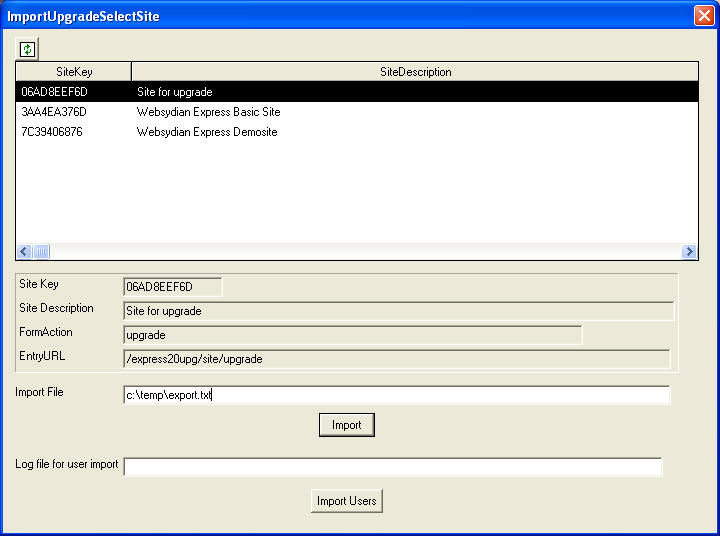
Enter the path and filename of the export file.
It is important to select the correct site as the selected site will be overwritten by the import process.
Press "Import". This process can take several minutes to execute.
When the process is finished, a dialog message will be shown - this message will contain information about whether the import was successful. The normal case is that the import was successful - but that some information has been written to the message log of the 2.1 installation:
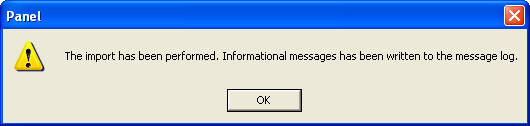
The dialog message can also report an error - this does not have to mean that the imported site is unusable - but you should check the message log to find out what the error was.
You can access the message log in the administration interface of the new site - or using the "Sites→Site Overview" process in the administration interface of the basicsite - the messages are shared between all of the sites.
Try to access the new site by entering the URL in the browser or by selecting the site in the "Sites→Site Overview".
The "Import Users" button and the adjacent "Log file for user import" input field are not used in this context. They are for the special case where you only want to update the users in the new site.
This step is only relevant if updating to WebsydianExpress 2.0.
WebsydianExpress 2.1 no longer validates registered events - so the import of events is no longer available in the 2.1 administration interface.
You should ensure that all registered events from the 1.2 site is transferred to the 2.1 site.
This is done by exporting the events to al file using the administration interface for the 1.2 site - and importing the file into the 2.1 site using the administration interface for the 2.1 site.
Use the "Export Events" administration process in the 1.2 site to create the file - specify the filename and path you want to use for the file.
Use the "Export Events" administration process in the 1.2 site to create the file - specify the AS400 library you want to place the import file in. As the import in the 2.1 site always takes the file from the database library of the 2.1 site, you should specify this library (e.g. WXP20DB).
This step is only relevant if updating to WebsydianExpress 2.0.
WebsydianExpress 2.1 no longer validates registered events - so the import of events is no longer available in the 2.1 administration interface.
Use the "Import Events" administration process in the 2.0 site to import the file - specify the path and filename you specified for the export in the 1.2 site.
Use the "Import Events" administration process in the 2.0 site to import the file - the file will always be imported from the database library of the 2.0 site - so if you specified something else in step 8 - you must move the file to this library.
Based on the site being upgraded and on the selections made for the rules for assigning roles to users and site elements a number of changes might be necessary.
Access the administration interface of the new site either by entering the URL of the site followed by /admin in the address field of the browser, or by selecting the link to the administration interface in the site overview page of the bascisite.
Use WSADMIN/ADMIN to log in to the administration interface.
Existing users in the 2.1 site (default "User" and WSADMIN") are not updated.
This ensures that you can always use the WSADMIN user to access the administration interface of the new site even though errors has occurred during the import process.
If you used the WSADMIN user account in the 1.2 installation you should be aware of that this user account is NOT imported into the 2.1 site in order to ensure that it is still possible to login to this site using the WSADMIN user account.
So you have to create a new account for the old WSADMIN user account which has the roles that corresponds to the authorization level for the old WSADMIN user account.
There is one change in the way the runtime handles the reload of the site that will in most cases necessitate at least one change of the imported definitions.
When you press a menu item, the runtime saves information about this menu item on the session. When the site is reloaded, the runtime loads the site based on this registration. In version 1.2 this was not possible, the site was always loaded in the same way no matter which menu items had been pressed.
Reloading based on the last used menu item is normally a desirable behavior. However, in case of the login page, this is not the case.
When you press the login menu item to load the login page, this is registered by the runtime when you perform a successful login, the site is reloaded, but due to the information saved saved on the session about the last pressed menu item, the login process will be loaded again.
This behavior can be changed by using the "Site Structure→Site Structure" process in the administration interface of the 2.1 site.
Select the login process and press "Update".
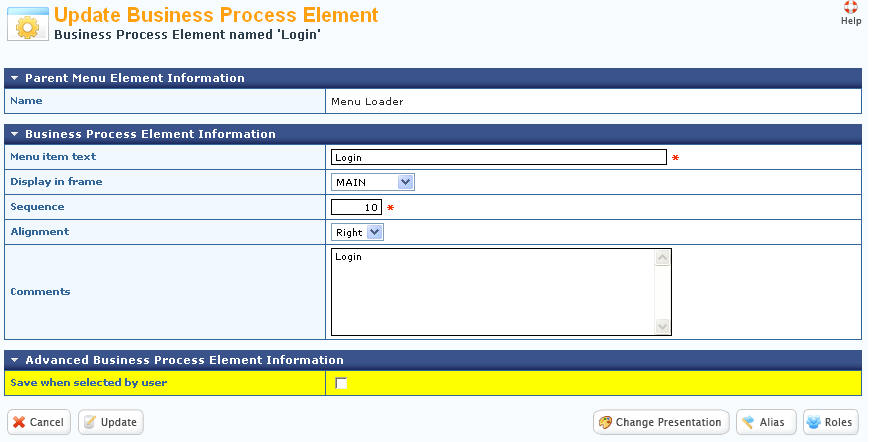
Press the "Advanced Business Process Element Information" bar to access the advanced settings.
Uncheck the "Save when selected by user" check box and press "Update".
Now, the login menu item will not be saved on the session, and the site will load normally after the login.
If you have added some web server resources (images, stylesheets, javascript files, etc) to the 1.2 installation these must be copied from the web server used in the 1.2 installlation to the web server used in the 2.1 installation.
Furthermore you should review the follow settings on all the folders defined in the 2.1 installation to ensure that they reference the correct web server resources: